Hi - first post on this site. Thanks for your patience.
I do moderate home repairs for my and my family's bikes. I have basic knowledge and basic tools, and I use videos (e.g. Park Tools) to help with tasks.
From community bike days, we got indications my wife's bike needed some work on its crankset and chain. We took it to a charity here in town (bike recyclers plus maintenance and workshops) and they agreed it needed new chain and crankset, as well as a new rim for the rear wheel. However, the price for the work was higher than we expected - nearly the price when we bought it from them, second-hand! After looking into component parts online, it seems the price is pretty much parts plus £65 for labour.
I'd like to see if I can do it myself. The process of removing and installing crankset doesn't seem too tricky, but I'm getting different advice based on what kind of crankset it is. Problem is, this crankset doesn't look like any of those options. I'd love help in identifying what this part is and how to remove/install it before buying new parts.
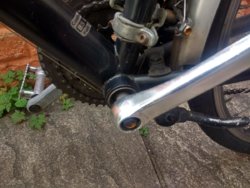
Her bike is a Dawes Mojave, but as it was bought from the recycler charity, I highly doubt the crankset is the stock or original part. It looks like a 2-piece crankset: the right crank is attached to the protective guard and sprockets, and the left crank seems to be attached by a bolt. But there are no pinch bolts - the crank is just a smooth shaft of steel with the pedal at one end and a hole at the other. The bolt fastening it to the spindle is hexagonal, but it's not small like an allen key would loosen; rather, it's big, like perhaps a socket wrench would loosen and tighten.
This is where I get a bit turned around, because none of the sites or videos I've consulted have used a socket wrench to remove the crank. Does this sound right? Can you offer any suggestions on a) how to remove the crankset and b) what I should buy to replace it?
Many thanks!
I do moderate home repairs for my and my family's bikes. I have basic knowledge and basic tools, and I use videos (e.g. Park Tools) to help with tasks.
From community bike days, we got indications my wife's bike needed some work on its crankset and chain. We took it to a charity here in town (bike recyclers plus maintenance and workshops) and they agreed it needed new chain and crankset, as well as a new rim for the rear wheel. However, the price for the work was higher than we expected - nearly the price when we bought it from them, second-hand! After looking into component parts online, it seems the price is pretty much parts plus £65 for labour.
I'd like to see if I can do it myself. The process of removing and installing crankset doesn't seem too tricky, but I'm getting different advice based on what kind of crankset it is. Problem is, this crankset doesn't look like any of those options. I'd love help in identifying what this part is and how to remove/install it before buying new parts.
Her bike is a Dawes Mojave, but as it was bought from the recycler charity, I highly doubt the crankset is the stock or original part. It looks like a 2-piece crankset: the right crank is attached to the protective guard and sprockets, and the left crank seems to be attached by a bolt. But there are no pinch bolts - the crank is just a smooth shaft of steel with the pedal at one end and a hole at the other. The bolt fastening it to the spindle is hexagonal, but it's not small like an allen key would loosen; rather, it's big, like perhaps a socket wrench would loosen and tighten.
This is where I get a bit turned around, because none of the sites or videos I've consulted have used a socket wrench to remove the crank. Does this sound right? Can you offer any suggestions on a) how to remove the crankset and b) what I should buy to replace it?
Many thanks!