Annirak's Foffa IGH Drop Bar Conversion

Page may contain affiliate links. Please see terms for details.
OP
OP
annirak

annirak

Veteran
Location
Cambridge, UK
Mega update!

I got sick the week before Christmas and then it was time for holidays.

A lot has happened! I’ll put a few posts up with my progress.

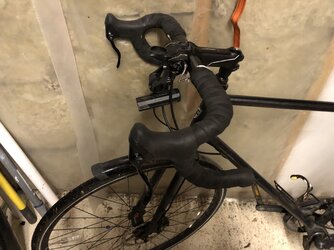
First, the brakes. I decided to go with the Tektro RL340 brake levers. I got a barb insertion tool since the m290 callipers didn’t come with vice blocks for the hoses. Swapping over the brake & hoses was pretty straight forward, but bleeding a conduct system is a pain due to the 45-degree angle you need. I don’t have a proper work stand so I rigged something with ratchet straps.

DCC6587E-3777-48D1-AE21-DCC55122CACE.jpeg


The bleed went well for the rear wheel but the front is still a bit spongy so I’ll have to try again.

I’m not totally happy with the lever pull before engagement. That might be a natural consequence of using giant conduct, or it might be that the m290 brakes aren’t quite right for the conduct master cylinder. Regardless, the RL340 levers have a quick release, which solved the problem. I released the levers, then tightened the cables, moving the engagement point much further forward.

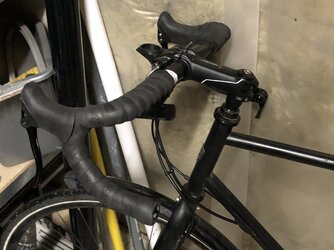
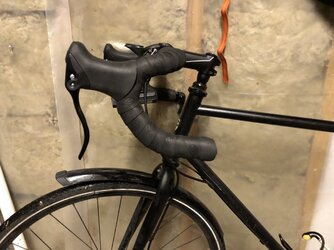
The zipp service course bars aren’t round. This has caused quite a few problems for me. The first problem this caused was with cable entry to the conduct master cylinder. Because the brake cable is very stiff, routing it out of the cable groove on the bottom of the bars, and around to the front, slightly above the midpoint wasn’t possible between the taped part of the bars and the master cylinder. I considered using a loop of cable outer, but that would have been quite ugly due to the large bend radius. I tried looking for an alternative solution. I think the right answer is probably Jagwire EZ-bend cable outer segments, but I didn’t find those until later. What I’ve used so far is flexible v-brake noodles, which are just about perfect!

D9E39D15-6AA7-4658-B5FE-2446545FCA6C.jpeg


1457D41C-E118-4CCA-A5E3-11AF931FAFDC.jpeg


D3738DB5-1187-46B9-90B0-0E3910CC81DF.jpeg


The next step was to wrap the bars. I used Cinelli Chubby. I’m hoping that it’s durable since this is my commuter bike. What I did discover is that the finish tape won’t stay down!
A9B67192-9A22-4CAB-AD9A-02CED60C221A.jpeg

Unfortunately the other problem with the Cinelli tape is that the bar end plug wouldn’t stay in. I’ve had to get expanding wedge plugs to sort it.
 
Last edited:
OP
OP
annirak

annirak

Veteran
Location
Cambridge, UK
The second problem that the zipp bars caused is that I wasn’t able to reuse the flat-bar shifter I had. I had to get a bar-end shifter instead. I had originally hoped that I could get mechanical brifters, but the microshift ones are now as expensive as ultegra brifters. I doubt they’re as good as ultegra. In the end, I got a jtek bar-end shifter. This will be a first for me, but it seemed like the only reasonable solution that wasn’t full di2.
706A135E-9891-4B26-A525-449ABD8DF67F.jpeg


7FE92D54-91D1-4C77-B0C5-F9A4B19EC11B.jpeg


EA85B824-D138-43B7-96AA-8E72EC743E37.jpeg


ED80B011-B675-4874-B9FD-5C66651CC5C1.jpeg
 
OP
OP
annirak

annirak

Veteran
Location
Cambridge, UK
Last night I got the Alfine hub connected. It was remarkably simple: clamp the bolt at 100mm. Done. I was concerned that the shift cable would interfere with the gates sprocket, since it's huge. Apparently, it's okay? It looks really close. No photo of that yet.

I tried the jtek shifter and I'm really happy with it.

Next, the bar tape:

7F48CEEC-E3C6-4776-BAAC-F32193D49745.jpeg


Finally, it’s getting somewhere!

78B79D0F-F21B-4004-8847-36AC88A8D844.jpeg

And with that, the cockpit is done. I bled the front brake again, and bedded them in. I have braking power back!

I mentioned earlier that the Zipp bars had caused me some trouble due to how heavily profiled they are. The final problem they caused is: between the Zipp bars and the Giant Conduct, there’s nowhere to mount a light, bell, or front reflector.

I solved part of this with the conduct accessory kit:
DF2A0B56-294C-44EB-9CFA-7CB48ED9A764.jpeg


I had to get a low-profile bell. I don’t have an answer for the reflector yet. Maybe I’ll mount it to the crown.

Here’s my bike out for its first proper ride!
7F3E752E-53EA-46A0-BA8D-274B9FB92468.jpeg


There’s a few things left to fettle. The rack needs installing, the mudguards replacing. I’m short two C buckles. I need to tighten the lock ring on the rear wheel better.

After the first ride, I can conclude that the RL340 levels are… nowhere near as comfortable as the bar tape. I wish I had done a figure-8 wrap over the hoods. considering tilting the bars back slightly to try and make it more comfortable.

The drops feel great though!
 

Attachments

  • 591DB3F5-DC18-4921-BD3F-9ED468EDCA4E.jpeg
    591DB3F5-DC18-4921-BD3F-9ED468EDCA4E.jpeg
    141.4 KB · Views: 2
  • E04F3BD8-9252-497F-9BCD-0A1F37023A02.jpeg
    E04F3BD8-9252-497F-9BCD-0A1F37023A02.jpeg
    144 KB · Views: 3
  • D6E8C22F-C3C9-4878-BD93-7901D13F6464.jpeg
    D6E8C22F-C3C9-4878-BD93-7901D13F6464.jpeg
    137.6 KB · Views: 4
OP
OP
annirak

annirak

Veteran
Location
Cambridge, UK
The Tektro RL340 levers I put on are too hard to reach, when mounted at the front of the drops. I tried rotating the bars up a little, which definitely helped. However, the drops are now nowhere near as comfortable as they were. I've moved the seat forward as well. Since this is a flat-bar bike converted to drops, the reach was always going to be a question. Turns out it's too long. Moving the seat helped a lot. A shorter stem would help too.

I think that I should have mounted the levers higher on the bars, but I think I didn't know how it was going to feel until I tried it. It also would have been good to do a figure-8 wrap over the bars instead of using the backing tape. The hoods of the RL340 levers are very hard, but the Cinelli Chubby tape I've used is quite soft, which makes an uncomfortable transition between the bars and the hoods.

The difficulty is that the Chubby tape was barely long enough for my bars as it is, and I don't think I had enough to spare to do a figure-8 wrap, which is why I didn't start with that.
 

T4tomo

Legendary Member
you have some unsightly white electrician tape showing which is offending my eyes - it would be better in black, I suspect you know tis are your bar tape length is the real issue.

now more usefully for you......

yes shorter stem is going to help your reach issue,
also to help reach, move the brake levers up towards the stem more - you can roll the bars forwards sightly to get the hoods at the right angle, this can gain you back 10-30mm of reach. obvs this means rewrapping from the hoods to centre, and you may need to twiddle with outer cable lengths depending on your interface to the giant brake reservoir thingy
 
OP
OP
annirak

annirak

Veteran
Location
Cambridge, UK
you have some unsightly white electrician tape showing which is offending my eyes - it would be better in black, I suspect you know tis are your bar tape length is the real issue.
You are absolutely right! I have removed the white tape. It should never have been there in the first place, but the cinelli tape didn't stay down on its own. Having sat with the white tape on top of it overnight, it appears to hold properly now, so the white tape is gone at last!
yes shorter stem is going to help your reach issue,
also to help reach, move the brake levers up towards the stem more - you can roll the bars forwards sightly to get the hoods at the right angle, this can gain you back 10-30mm of reach. obvs this means rewrapping from the hoods to centre, and you may need to twiddle with outer cable lengths depending on your interface to the giant brake reservoir thingy
I definitely want to try moving the levers up a bit. Rolling the bars is an interesting option. I like how the bars were clamped originally. The drops were really comfy without having to get by torso way down and my elbows bent to get the right angle for my hands. Now that I've rolled them back to make the hoods more comfortable, I'm back to needing quite a large bend in my elbows to get the right hand position. If I shifted the levers up, the bars down, and did a wrap of bar tape under the hoods, that might get me the best result.

I'm just not enthusiastic about rewrapping the bars. I had to rewrap the left bar to get the gel pad in, which I forgot on the first go. The adhesive strip tore the surface of the bar tape up more than I'd like.

I wonder if part of the problem is the RL340 levers themselves. I had a pair of Ultegra levers to compare against. They sit higher up the bend of the bars, which makes them a bit easier to fit.

It's a shame that TRP Hylex sets were so hard to come by. I think they would have made several things easier!
 
OP
OP
annirak

annirak

Veteran
Location
Cambridge, UK
The mudguards were trashed so it was time to replace. I sourced a set of SKS bluemels. I need the long coverage because the commuter is typically towing a trailer, and partly disintegrated SKS longboards I'd been using were good enough to keep my back from getting muddy... the trailer was another story. Completely covered in mud.

Removing the rear longboard was a disaster. I couldn't get the chain stay bolt undone. I tried lubing it, cleaning the socket for better engagement with the hex driver, etc. Nothing. I even brought out the impact driver and my trust Wera Impaktor bits... All they did was strip the socket!

Finally, I dug through the drawer of visegrips and found a set that was narrow enough to grip the head of the socket bolt between the chain stays. Even that didn't do much.

At this point, I cut the old mudguard for better access, removed the kickstand, and spotted the rear hole in the other side of the chain stay bridge. With that access, I was able to douse the back side of the bolt in penetrating lubricant. Finally I got the thing moving with the visegrips. It took me over an hour to remove a single bolt...

When I went to bolt the new mudguard into the chain stay bridge, I obviously greased the bolt. Let's not have that happen again. Then, the next problem. The mudguard didn't come with an adaptor to fit between narrow stays. And I'd just cut the old one from the longboards in half. Luckily, I had some perforated fixing strap. Cut to size, and it's now holding the mudguard just fine.

Getting the rear stays to play nice with the rack was tragic. I ended up having to use spacers to push the rack stays out so that the mudguard stays could fit underneath. This was only a problem because I have Axiom's disc-compatible rack, which is for bikes with disc brake callipers mounted to the seat stay. Mine is mounted to the chain stay. :banghead: Live and learn, I guess. The spacers were easier than a new rack, but a more appropriate rack is probably the "correct" answer.

The instructions from SKS suggest cutting the stays with a hacksaw. I tried that. :banghead:I gave up and got out the Dremel, which was through them in seconds.

After all that pain to get the rear mudguard in, the front one was trivial. It went off without a hitch.

I also swapped the stem for a 70mm stem, which has solved the reach problem.
 
Top Bottom