Help - Rod Brakes!

Page may contain affiliate links. Please see terms for details.

olliewally87

New Member
Hi,

I am new to this forum, so first of all hello!

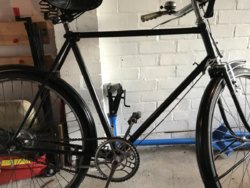
I’ve got a question regarding rod brakes - I’ve been trying to get the rear rod brake on my 1952 Triumph working. To me, the rod underneath the down tube appears too long - could this be the case? I got the bike from a jumble and It wasn’t working at the time so I wonder if I’ve got the wrong part. Anyone got much experience with rod brakes that could offer some advice? I’ve attached a photo for reference!

Thanks in advance.
Ollie
 

Attachments

  • 948FE296-8B40-46A9-A2ED-8CDEB258D2D0.jpeg
    948FE296-8B40-46A9-A2ED-8CDEB258D2D0.jpeg
    202.3 KB · Views: 56

classic33

Leg End Member
Paging @tyred
 

classic33

Leg End Member
From the picture, the brakes seem to be able to follow the wheel rotation when applied, might explain the angle the blocks are at.

There's a support missing, or not in use.
 

tyred

Legendary Member
Location
Ireland
I'm on my phone the moment and only looking at a small picture but it looks like the stirrup is not sitting on it's bracket which keeps it located.

I'll have a proper look later and write a better reply when I get to my computer but a close up photo of the rear brake would help.
 

snorri

Legendary Member
The rod under the down tube does not require to be a specific length as there should be a clamp at the bottom end of the rod which is used to shorten/lengthen the rod as part of the brake adjustment procedure. Any excess length (within reason!) just extends harmlessly below the clamp.
 

tyred

Legendary Member
Location
Ireland
It looks like the brake stirrup has come out of place. The two pegs at the back should sit in a hole (or slot - designs varied over the years) which holds them in place and acts as a guide so when you pull the brake, they slide forward and remain perpendicular to the rim. You can see in this photo how it should sit -
maxresdefault.jpg


It may be necessary to slacken the clamping bolts and slide the brackets forward on the chainstays so they are in the correct place. Assuming your rim is basically round, true and without any flat spots, you should adjust them to only have a slight gap between the blocks and the rim and so that the stirrup doesn't bottom out on the guide brackets - keep ~ 3/16" gap as can be seen in that photo and have it adjusted so that the pad is making full contact with the rim's braking surface and not sitting a little out past the edge. Use a wooden mallet or similar to knock the guides into correct alignment. Put a single drop of engine oil or other reasonably heavy oil on the guides and all other pivots in the system as they will be easier to pull and more efficient. It can sometimes help to lightly sandpaper new brake blocks to suit the curvature of the rim.

Setting these up can involve a bit of trial and error and requires patience but once adjusted correctly, they should never need anything other than an occasional drop of oil on the pivots and guides for years to come. Just be aware that they don't work very well in the rain but the front one should be a pretty powerful brake in the dry - the rear ones always seem to have flex in the linkage and don't work as well as the front.

You might get some tips from these videos


snorri

Legendary Member
I suspect the first picture that Tyred has posted depicts a more modern bicycle to that which I was trying to describe in my earlier post. The rod shown is obviously made to fit that bicycle, and the brake adjustment is made on the short link below the chain stay.
 
Top Bottom