A New Project

Page may contain affiliate links. Please see terms for details.

ian c

Active Member
Location
Wolverhampton
No soner than the Wearwell is almost finished - well, back on its wheels - than another bicycle joins it. And this one is going to be just as much fun I reckon.

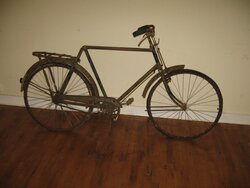
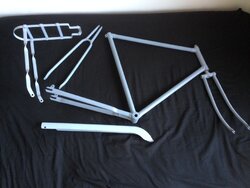
I succumbed to the perils of eBay and bought a Sunbeam ladies cycle. This is a very original looking machine, age to be determined but possibly a BSA-era 40's model, and with some interesting period bits on it too. The bicycle was owned by a lady who rode it round the lanes of Newport in Shropshire to and from work and is one of those rare examples of something that has literally never been refurbished or even touched - so it's faded, rusty and dusty but all there and could be a nice project to bring back to factory fresh. I picked it up at lunchtime and now I've had a ham sarnie I'm off to get some pics and rub a few bits to find out its age. Back in a bit!
 
OP
OP
ian c

ian c

Active Member
Location
Wolverhampton
Okay, some more details and a few pics.

Here it is!


jXyiGaU.jpg


Okay, not perhaps the clearest picture you'll ever see but not too bad.

The decals on the bicycle are faded but the details can be seen which will make positioning new ones and doing the pin-striping more straightforward
SIlFeBg.jpg


The stamped badge on the headstock points this to being made while under the ownership of BSA
k16v1ip.jpg


A nice little touch: the pedals feature the Sunbeam name
DECDEGu.jpg


There is also a Shuresta stand on the bicycle but I believe this was something fitted later - mainly because the leg is too long for it to be usable!

Finding a frame number is proving a challenge. Nothing around the vicinity of the seat post. The left rear lug has '76' stamped in it while the underside of the crank case has '121' and '12' cast. The numbers may be on the frame hidden inside the chain bath; I will know when that comes off shortly.

The hubs are BSA front and rear, the front being a Hublite and the back a 3-speed with gearchange done by a mechanism mounted on the handlebars. No dates appear to be stamped on them. The rims are solid if also now only having a vague knowledge of any chrome once being on them, and the saddle is a rather comfy Terry.

So, age not yet known although a check with the Marston Sunbeam Owners points the age to be early 40's which correlates with the details given by the family I purchased it from. I will keep digging more though to know better.

Plans? First, get everything working, then measuring all the decal positionings, and finally a strip and restore back to as good as when it came out the factory, with all parts cleaned and restored to as new condition. Barring anything snapping or simply disintegrating of course!
 
OP
OP
ian c

ian c

Active Member
Location
Wolverhampton
Lots of examining and taking things off then putting them back on today. The one minor success is finding the frame number - T3176 - although finding what that means in terms of date is frustrating as I can't find any BSA-era frame info.
 
OP
OP
ian c

ian c

Active Member
Location
Wolverhampton
That's a very good question and in the case of this model you could argue for either choice, especially as when I first saw it my initial thought was to preserve.

The reason why I have decide to restore it is down to the bicycle being at a point where if I rebuild and refinish all the original parts they will last much longer than trying to slow down the corrosion. The chrome finish on the bars, wheels and other parts has simply had it for example, and are on the cusp of becoming scrap within a couple of years unless they are dismantled and treated. It's the same story with the mudguards; they are not in a good way really but I can save them if they are treated and refinished now. If I leave them they will be gone - and they need to be straightened in any case. The chain bath could be kept as is but with there are dents and ripples on it, one of which is catching the chain so I will be sorting that out, and the finish will end up with some damage from the work as a result.

There's a couple of other reason though which are swaying me to a complete restoration. First is just how little info exists online, which, if it's okay by the forum mods, I'd like to help redress a little by putting all the pics and info I discover on here while dismantling and overhauling this model. And second, there are some superbly preserved examples already out there - this one wouldn't get close to being as good as them and would start to crumble now. However, I've not seen one restored to factory-fresh condition and the engineer in me wants to take the bicycle and its parts and get them working as good as when the left the line.
 
OP
OP
ian c

ian c

Active Member
Location
Wolverhampton
A nice day today steadily removing parts and checking them over. The only fixings that refused to budge were the screws holding the mudguard stays onto their fishplates - a hacksaw soon sorted them out. With them out the way I could sort out the various bulges and bent edges - a little bit of time with the hammer and dolly got them straightened and looking pretty respectable again.

So far then the frame is getting towards its details being measured. I took a few minutes to do the rear mudguard as a first practice and have put the info below in case anyone else needs some help doing box detailing on a Sunbeam bicycle. Bit of a rubbish arc for the mudguard but you get the idea.

hxJd3mH.jpg
 

shadaboot27

Senior Member
Location
Bedfordshire UK
I'm really looking forward to seeing this finished! I normally don't like full restorations as I like to see these bikes in original condition. However I do like seeing them when people go the extra mile to do it properly like you do, with a detailed respray, re-chroming and replica decals. The last one you did looked amazing so I'm sure this one will too. Also I have a question about re-chroming. With most of the bikes I work on, usually the steel rims have very worn and rusty side walls due to brake pad wear. I have always considered getting the rims re-chromed but was always under the impression that it would cost and arm and a leg. Do you mind me asking roughly how much it would cost to have a pair or rims done? And does it work out cheaper if you have a big batch done at a time? Rather than having individual bits done?

Cheers
 

shadaboot27

Senior Member
Location
Bedfordshire UK
That's a very good question and in the case of this model you could argue for either choice, especially as when I first saw it my initial thought was to preserve.

The reason why I have decide to restore it is down to the bicycle being at a point where if I rebuild and refinish all the original parts they will last much longer than trying to slow down the corrosion. The chrome finish on the bars, wheels and other parts has simply had it for example, and are on the cusp of becoming scrap within a couple of years unless they are dismantled and treated. It's the same story with the mudguards; they are not in a good way really but I can save them if they are treated and refinished now. If I leave them they will be gone - and they need to be straightened in any case. The chain bath could be kept as is but with there are dents and ripples on it, one of which is catching the chain so I will be sorting that out, and the finish will end up with some damage from the work as a result.

There's a couple of other reason though which are swaying me to a complete restoration. First is just how little info exists online, which, if it's okay by the forum mods, I'd like to help redress a little by putting all the pics and info I discover on here while dismantling and overhauling this model. And second, there are some superbly preserved examples already out there - this one wouldn't get close to being as good as them and would start to crumble now. However, I've not seen one restored to factory-fresh condition and the engineer in me wants to take the bicycle and its parts and get them working as good as when the left the line.

By the way, if this bike was left in a warm dry place (inside) untouched it would last another 200 years probably! These things were certainly built to last and as long as they are not left outside in the rain they will last. The surface rust that is on the bike wont get any worse if it's dry stored and especially if you spray some oil over it every few months. Just thought I'd give you a heads up, maybe it would help with your decision to refinish it or not. But whatever you do with it I'm sure it will turn out great. :smile:
 
OP
OP
ian c

ian c

Active Member
Location
Wolverhampton
I'm pretty sure that if wiped with the old oily rag then the frame should last a fair bit longer. Sadly however that's likely the only item that would. I can't oil the rims for obvious reasons (I had a friend who did that when we were kids with comical results!) and the corrosion has crept under the chrome plating on both the rim, bars and other parts so that it would continue unabated if not dealt with. I do agree with the sentiments from yourself, raleighnut and biggs though and I love well-preserved examples too. It's just this one wouldn't be very good and will rapidly become unsafe soon too. And when finished it won't be sitting looking pretty in my workshop either - it will be ridden often. Anything with wheels in this household earns its keep! ^_^

In terms of the cost of re-chroming parts, I'm sort of closing my ears to that! Having the rims rechromed will be over double the price of buying some replacements (the cost of re-doing the fuel tank for my BSA motorbike made me wince and that thing was largely rust-free to start with). Getting everything done in a single batch might get me a small discount but it's largely down to how much prep time each item needs, although I can do a lot of it myself to help chip that back a bit.
 
Last edited:
OP
OP
ian c

ian c

Active Member
Location
Wolverhampton
Bit more time spent measuring and scratching of bonce to get various bits of the box detailing properly specced. Here's the front mudguard info in case anyone needs some guidance.


kG2dLMf.jpg
 

shadaboot27

Senior Member
Location
Bedfordshire UK
Bit more time spent measuring and scratching of bonce to get various bits of the box detailing properly specced. Here's the front mudguard info in case anyone needs some guidance.


kG2dLMf.jpg

This is brilliant! I might start doing this too and making them available online so that people restoring bikes can know exactly where to put the pin stripes after a respray. I think the veteran cycle club site would be interested in adding things like this to their database.
 
OP
OP
ian c

ian c

Active Member
Location
Wolverhampton
I wasn't really sure if this stuff already existed and I was wasting everyone's time with doing it, so if it's of use then great - glad it might be of use to others as I put more of the info up.

On the subject of decals I sent a message last night over to Nick at H Lloyds about the box detailing and whether he supplied this and he sent a reply this morning. Basically it might well be possible to provide decals but it may well be quite costly due to them needing a lot of time to set up but he has done them before. Certainly something to consider then and very good of him to get back to me so quickly too. It got me thinking about laying down the boxing by hand as originally, but possibly with the aid of some thin masking tape (Using tapes such as Jammydog or EDGE which might get very close to the line widths and spaces I would be looking for). If I go down this route then to match with any decals I'd need the RAL or CMYK info to sort out the paint.
 

shadaboot27

Senior Member
Location
Bedfordshire UK
I wasn't really sure if this stuff already existed and I was wasting everyone's time with doing it, so if it's of use then great - glad it might be of use to others as I put more of the info up.

On the subject of decals I sent a message last night over to Nick at H Lloyds about the box detailing and whether he supplied this and he sent a reply this morning. Basically it might well be possible to provide decals but it may well be quite costly due to them needing a lot of time to set up but he has done them before. Certainly something to consider then and very good of him to get back to me so quickly too. It got me thinking about laying down the boxing by hand as originally, but possibly with the aid of some thin masking tape (Using tapes such as Jammydog or EDGE which might get very close to the line widths and spaces I would be looking for). If I go down this route then to match with any decals I'd need the RAL or CMYK info to sort out the paint.

I tried the masking tape route once, I used very fine line detailing tape. This is just a tester I did on some scrap metal. I never actually got round to finishing the bike. It could definitely work but I found when I did it that the lines were a bit too thick. I had the colours mixed up into spray cans at £13 a can.
 

Attachments

  • 247173_10150656628390564_2829517_n.jpg
    247173_10150656628390564_2829517_n.jpg
    46.5 KB · Views: 53
  • 58a3cb1a30e27b41f87c12389e7090f6.jpg
    58a3cb1a30e27b41f87c12389e7090f6.jpg
    75.1 KB · Views: 50
  • 267398_10150688264555564_7536116_n.jpg
    267398_10150688264555564_7536116_n.jpg
    43.2 KB · Views: 57
  • 268603_10150688264655564_2483186_n.jpg
    268603_10150688264655564_2483186_n.jpg
    28.1 KB · Views: 45
  • 268000_10150688267140564_5012264_n.jpg
    268000_10150688267140564_5012264_n.jpg
    56.7 KB · Views: 51
OP
OP
ian c

ian c

Active Member
Location
Wolverhampton
Nice bit of work there, got me nervous whether I can get to that standard now! ^_^

Getting the pin striping width correct should be possible either using a double wheel striper shimmed to the correct gap, or go with a brush with 2mm masking tape to set the gap and setting out the line width with a vernier gauge. Your test pics have me thinking it would be a good idea to paint a couple of pieces of steel I have lying about as I can try the masking along with how the decals can be best laid and then lacquered, which is going to be interesting as Sunbeams were painted to resemble a Japanned finish.
 
Top Bottom