
voyager
E- tadpole Triker
Hi Folks
With the workshop too cold to spray and another couple of projects stalled at present .
I was starting to get rid of some old bits of frames , when I had an Idea ( oops sorry ) .
A low cost trike built from a few bits of left over tubing that could be swapped for pieces from a scrap bike frame and using the rear triangle from a MTB and BMX 14 mm spindles front wheels .
I have a rear 24" wheel and rear MTB triangle spare and a pair of BMX front wheels that came from our local tip
The "new " parts for the build will be :- the rear freewheel , 3 x 112 link 3/32 chains , a 80mm Ball raced nylon pulley as I don't believe in using second hand parts for the transmission I will also use NEW brake and gear cables for safety reasons .
The locust is a basic tadpole trike that can be built from anyone with some welding experience from a few scrap bike frame but still look like a professional Build . the use of round and oval tube will give it that shop built look ,
So here is the "concept " and the start of the project in photos .

The basic parts , the piece in front is a piece of oval tube cut at an angle of 75 degrees ( 15 degrees on the chop saw ) that is a sliding fit in the main piece of the MTB frame this gives the caster angle for the front boom and allows the front to rear section of the boom to line up perfectly . the cross boom made from a piece off a scrap childs gate has the camber angles ( 75 degrees ) cut into the ends of the tube and the centre tube is drilled to clear the 29mm seat tube which will form the stub to hold the adjustable pedal /BB boom . This fabrication "joint " will make assembly easier to jig up and weld .
The pedal/bb boom was cut from a standard DF frame and uses the down tube and part of the seat tube .
The seatpin will be used as a sleeve to strengthen the join where the sliding BB boom is clamped onto the stub of the nose that sticks through the cross boom .
The trike will have an approx track of 30" and a wheel base of 41 inches and Direct Knuckle steering for simplicity with caliper front brakes .

The frame with its main pieces slotted together as a test run for the welding once the cross boom has be welded up and the front axle lugs welded on the fork tubes
Well that is it for now and I hope to continue the build after the new year and I hope I may have whet your appetite in building your own DIY tadpole trike .
Happy Christmas all
regards emma
With the workshop too cold to spray and another couple of projects stalled at present .
I was starting to get rid of some old bits of frames , when I had an Idea ( oops sorry ) .
A low cost trike built from a few bits of left over tubing that could be swapped for pieces from a scrap bike frame and using the rear triangle from a MTB and BMX 14 mm spindles front wheels .
I have a rear 24" wheel and rear MTB triangle spare and a pair of BMX front wheels that came from our local tip
The "new " parts for the build will be :- the rear freewheel , 3 x 112 link 3/32 chains , a 80mm Ball raced nylon pulley as I don't believe in using second hand parts for the transmission I will also use NEW brake and gear cables for safety reasons .
The locust is a basic tadpole trike that can be built from anyone with some welding experience from a few scrap bike frame but still look like a professional Build . the use of round and oval tube will give it that shop built look ,
So here is the "concept " and the start of the project in photos .
The basic parts , the piece in front is a piece of oval tube cut at an angle of 75 degrees ( 15 degrees on the chop saw ) that is a sliding fit in the main piece of the MTB frame this gives the caster angle for the front boom and allows the front to rear section of the boom to line up perfectly . the cross boom made from a piece off a scrap childs gate has the camber angles ( 75 degrees ) cut into the ends of the tube and the centre tube is drilled to clear the 29mm seat tube which will form the stub to hold the adjustable pedal /BB boom . This fabrication "joint " will make assembly easier to jig up and weld .
The pedal/bb boom was cut from a standard DF frame and uses the down tube and part of the seat tube .
The seatpin will be used as a sleeve to strengthen the join where the sliding BB boom is clamped onto the stub of the nose that sticks through the cross boom .
The trike will have an approx track of 30" and a wheel base of 41 inches and Direct Knuckle steering for simplicity with caliper front brakes .
The frame with its main pieces slotted together as a test run for the welding once the cross boom has be welded up and the front axle lugs welded on the fork tubes
Well that is it for now and I hope to continue the build after the new year and I hope I may have whet your appetite in building your own DIY tadpole trike .
Happy Christmas all
regards emma


 it was a hard fight but I have got there and I don't want to return there again
  came out , we triked down to Shoreham beach for a couple of hours
  and thermals
  I braved the 5 metres between the house and garage to do an hours work before dinner
  but they are easy to make
  .
. as I hope to have another couple of days doing very little over the New Year ( In reality I have the Kitchen ceiling to paint and the wall to emulsion as we had a flat roof leak just before Christmas , Having fixed the roof it only leaves the room to redecorate
  )
) the brake calipers which I think
  are at the bottom of the bike bits dustbin
 Ken is now using the e-shopper as a commute to work bike and has put several miles on it so far this week
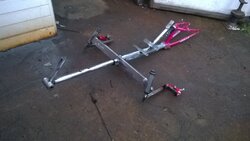
 ) so as it was so wet I cleaned them up in the garage ( after half an hour with a flap wheel about the time my cup of tea ran out