recumbent trike build

Page may contain affiliate links. Please see terms for details.

stuee147

Senior Member
Location
north ayrshire
well about 10am this morning the metal for my trike arrived unfortunately so did the rain :sad:
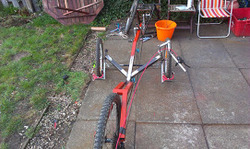
just after lunch the rain let up and we even had a bit of sun well sort of lol anyway i had a few hours to work on the frame so i cut and welded the rear forks made the main frame section and the back rests then welded that all together.
4UTfjjDZqWZRfLOMdTn0BDqpKbava-gYccCXNYq33v0=w346-h207-p-no.jpg
uJyApzclRaQLllR19kJzd0IJpPS0XfarkqpXMKFn5QA=w346-h207-p-no.jpg


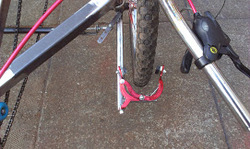
then i made the front wheel axle and head tube mounts and welded into position
3QJ_cI8fWR4eG2gDGK0czN5CmFAuICLRCv_bIg4L1yE=w292-h175-p-no.jpg
QFtgRshJGh_CMWNOimzV5BFjgmkrMdYYx18U6IQn4vo=w379-h227-p-no.jpg

3jXiPYhvzJk4VB3p0Dj4DVDaUJ5-VoW6JYHk_udRHCE=w292-h175-p-no.jpg


then i had to pack up as my dinner was ready lol
im hoping that i will be able to get the front wheels on and make the bracket for the bottom bracket and then fit the chain brakes and test it tomorrow lets hope the rain holds off ...

stuee
 

fixedfixer

Veteran
You don't hang around...let the sparks fly!
 
OP
OP
stuee147

stuee147

Senior Member
Location
north ayrshire
Do you mean you talk about it a bit first then crack on :whistle: ^_^

talk about it think about it plan it then think about it a bit more lol

well today didnt get much done due to the rain and a meeting i had to have this afternoon. but still the front wheels are all on and the headtubes are welded on and the bottom bracket bracket is done so lets hope i have better luck tomorrow
 
OP
OP
stuee147

stuee147

Senior Member
Location
north ayrshire
well yesterday was a good day spent a few hours working on the trike got it up and running and had a few dozen spins around the garden i cant wait to get it finished even without the seat it was so comfy and easy to ride the only problem is iv not done the brakes yet i have fitted the front brakes but there not connected up yet. and i only have the rear gears iv not sorted the front out yet but its still great to have a trike i can ride :hyper:

i forgot to take pics as i built but here is a couple of where i had got to yesterday evening
htb5VzK_obP9nwoePgl3lfUsGIUZMvgeOtnBa7sipu0=w271-h162-p-no.jpg
Cs8AMVFygy07-wuqsNBxWanLb0oZUPZZeSv27quHpOc=w271-h162-p-no.jpg
-S3wO-Barhx3B5VeRuoL8e1XtohR-XLBZm1nCKcfiVA=w271-h162-p-no.jpg

iv used 2 skateboard wheels with a channel cut into them as chain guides for the drive side of the chain. but i found the slack return side of the chain dragged on the ground so i dismantled and used the 2 cogs and frame from an old rear deraila to lift the chain and take it out slightly so it didnt foul on the drive side of the chain.
the handlebar you can see isn't going to be the finished one i just stuck it on so i could sort the chain and gears and test it. when i have the seat fitted i will work out exactly how i want it and make it up to suit me. and before someone points out it only has one handlebar there is a reason iv not just forgot lol its only going to have a handle bar on the right. on the left i will make some form of arm rest, iv been thinking of maybe a small box type where i can stick things like keys phone ect. and there will also be a rear brake leaver which will also be a hand brake and then a front gear leaver. i may try a handlebar to start with but im not sure yet ill have to see how it feels when im on it.

anyway today i dont think ill get much done its peeing down with rain here :sad::angry: god i miss having a workshop where i can work in the dry
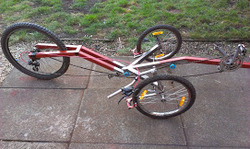
 

Attachments

  • htb5VzK_obP9nwoePgl3lfUsGIUZMvgeOtnBa7sipu0=w271-h162-p-no.jpg
    htb5VzK_obP9nwoePgl3lfUsGIUZMvgeOtnBa7sipu0=w271-h162-p-no.jpg
    13.7 KB · Views: 121
  • Cs8AMVFygy07-wuqsNBxWanLb0oZUPZZeSv27quHpOc=w271-h162-p-no.jpg
    Cs8AMVFygy07-wuqsNBxWanLb0oZUPZZeSv27quHpOc=w271-h162-p-no.jpg
    14.2 KB · Views: 99
  • -S3wO-Barhx3B5VeRuoL8e1XtohR-XLBZm1nCKcfiVA=w271-h162-p-no.jpg
    -S3wO-Barhx3B5VeRuoL8e1XtohR-XLBZm1nCKcfiVA=w271-h162-p-no.jpg
    13.2 KB · Views: 93

fixedfixer

Veteran
Looking good. Great progress here. Thanks for sharing the build. Can't wait to see the end result if there ever is an end as I'm sure you'll keep tweaking it.
 
OP
OP
stuee147

stuee147

Senior Member
Location
north ayrshire
thanks im pleased with it but i think your right it will never be really finished there will always be something ill want to change or try out.
iv already started planing my next build im thinking about suspension iv seen a few with fount and rear suspension and i like the looks of it im just not sure how to do the front yet. but im sure i will work it out and get it done sooner or later lol
 

fixedfixer

Veteran
Ref the brakes. I can't see clearly from the photo what type of caliper you are using, but I wonder if a couple of those brakes fitted to the rear of womens bikes might be good. They are a single pivot but the cable pulls from below rather than top. In your situation it would mean the cables would then go upwards rather than down towards the road. Hope I am making some sense with my description here? Try this linky to an example on Amazon.......

http://www.amazon.co.uk/Rear-Alloy-Brake-Calipers-White/dp/6254388200/ref=sr_1_28?s=cycling&ie=UTF8&qid=1395509482&sr=1-28&keywords=bikes brakes
 
Last edited:
OP
OP
stuee147

stuee147

Senior Member
Location
north ayrshire
Ref the brakes. I can't see clearly from the photo what type of caliper you are using, but I wonder if a couple of those brakes fitted to the rear of womens bikes might be good. They are a single pivot but the cable pulls from below rather than top. In your situation it would mean the cables would then go upwards rather than down towards the road. Hope I am making some sense with my description here? Try this linky to an example on Amazon.......

http://www.amazon.co.uk/Rear-Alloy-Brake-Calipers-White/dp/6254388200/ref=sr_1_28?s=cycling&ie=UTF8&qid=1395509482&sr=1-28&keywords=bikes brakes

yes i think i know what you mean at the moment the cable is run to the top thats how the brakes were delivered, but i have been toying with the idea of bringing the cable in from bellow and also if you can see from the picks both brakes have the cable on the left but im going to reverse the left brake so the cable comes in on the right and at the bottom giving a better run for the cable, the way i have run the cable is from the brake leaver it runs down the head tube and along the top of the frame and under the seat base, it then travels along the top of the main frame and into a clip that holds the outer cable the inner cable then goes around a pulley at the end of the frame tube, the cable then leaves the pulley running along the underside of the frame and up towards the front. the cable then goes into one of the splitter clip thingys that you have on v brakes. then i have 1 cable running from one front brake along the bottom of the wheel arm frame into the middle under the seat where it runs threw the v brake clip thingy and off up the other wheel arm frame and to the other front brake. it seems to work quite well.

yesterday i spent most of the day running cables and testing and rerouteing then testing and so on i did finish the seat frame and i have just put some webbing straps around the frame as a temporary seat to test before i get the proper cover sorted. i did get to take it for its first proper run up the road im getting a lot of problems getting the gears to change properly im thinking of swapping the rear wheel and gears for a set iv used and been able to set up before.

once i have got the gears and brakes all sorted and working properly i will then strip the frame down and do a final clean and sand down then paint then rebuild and away i go ^_^^_^

hear are a couple of pics i took yesterday evening you can see the seat and how iv done the back so i can adjust the angel iv not sorted the way of locking it at different angels yet but i have an idea of how i will do that
BlXyF6jUIyaMmdqLFcmI5Nmy3emetu4DhLkL2t4yRJc=w293-h174-p-no.jpg
BqV6JCPC9sTELSBXdFQrQJn_3SpUaadSlaTVRKtv6n8=w292-h174-p-no.jpg
HNwUfR3RVPENqkCGuLtyvVYFKrIpmLqgkz1V3HhSCS8=w292-h174-p-no.jpg


the last picture is of how i have the chain guides set up and it seems to work quite well
 
Top Bottom