Short answer, no, tubes are standard sizes, (long answer involves Cinelli once using Reynolds tubes but the world of big business got involved).but does Cinelli BB shell indicate Columbus tubing?

You are using an out of date browser. It may not display this or other websites correctly.
You should upgrade or use an alternative browser.
You should upgrade or use an alternative browser.
Shorter & Rochford
- Thread starter biggs682
- Start date
Page may contain affiliate links. Please see terms for details.
Hourigan14
New Member
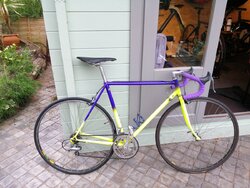
I have 2 I will be restoring soon, any information would be great. The road bike was bought for my partner in about 1986. Her father was friends both Alans and Barry. The frame only has a made by chick sticker on it. What tubing?
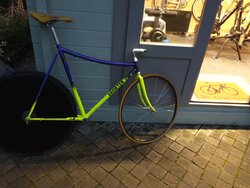
I recently found a low pro in the same colour scheme so had to buy it😄, 531 professional


I recently found a low pro in the same colour scheme so had to buy it😄, 531 professional
Attachments

OP
OP
biggs682
Itching to get back on my bike's
- Location
- Northamptonshire
If you fancy another one let me knowI have 2 I will be restoring soon, any information would be great. The road bike was bought for my partner in about 1986. Her father was friends both Alans and Barry. The frame only has a made by chick sticker on it. What tubing?
I recently found a low pro in the same colour scheme so had to buy it😄, 531 professional View attachment 559964 View attachment 559965

Hi, nice to see some 'chicks', I have three in various disguises, a shorter, a viscount, and a panto'ed chick, all beautifully created frames from a builder worth more exposure than he gets, a vernier caliper and internal/external tube measurements should reveal the tubing ( search the interweb, I won't know that much detail ), Barry did use Columbus as well as Reynolds tubing, thanks for showing them. Terry
Photos to follow but just bought two Alan Shorters, both are from his shop in Luton.
Spoke to Alan Rochfords son earlier today and asked if he knew who the frame builder was an his answer was Barry Chick.
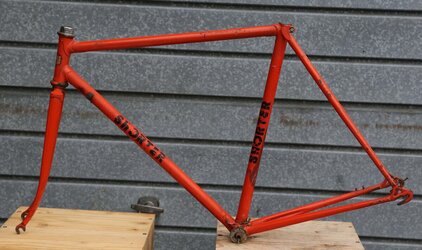
Both frames came from the son of the first owner. One is a very short wheelbase geared T.T machine, the other more of a touring one ( lamp boss on the fork and mudguard eyes).
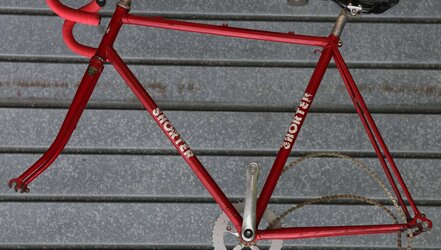
Head transfers good enough to get redrawn to be printed.
Spoke to Alan Rochfords son earlier today and asked if he knew who the frame builder was an his answer was Barry Chick.
Both frames came from the son of the first owner. One is a very short wheelbase geared T.T machine, the other more of a touring one ( lamp boss on the fork and mudguard eyes).
Head transfers good enough to get redrawn to be printed.
OP
OP
biggs682
Itching to get back on my bike's
- Location
- Northamptonshire
OP
OP
biggs682
Itching to get back on my bike's
- Location
- Northamptonshire
Forks out of the orange one no number on them - has Campag ends
Thinking about it i don't think i have dropped the forks out of mind to check for a number that would hopefully match the bottom bracket stamping .
There's what looks a nice one on facebook market place bit pricey i think
https://www.facebook.com/marketplac...wse_serp:c5d4021a-6e1c-4902-b914-db3abb181085
Thinking about it i don't think i have dropped the forks out of mind to check for a number that would hopefully match the bottom bracket stamping .
There's what looks a nice one on facebook market place bit pricey i think
https://www.facebook.com/marketplace/item/1120089995503855/?ref=search&referral_code=marketplace_search&referral_story_type=post&tracking=browse_serp:c5d4021a-6e1c-4902-b914-db3abb181085
@barr313 would be interested to see what the frame numbers are on your two new machines
Had the forks out of the red one to check the number. It is 03 46 34.
Had some infomation about Alans Luton shop. It changed to a cycle shop for the rating year 1972
OP
OP
biggs682
Itching to get back on my bike's
- Location
- Northamptonshire
Had the forks out of the red one to check the number. It is 03 46 34.
Had some infomation about Alans Luton shop. It changed to a cycle shop for the rating year 1972
My Gold https://www.cyclechat.net/threads/shorter-no-3277.245135/ shorter has a 4 digit frame number and was built around 78 as far as the previous (original) owner could recall
I have had the older intertwined Alan Shorter head badge drawn and have some available if needed and can have more printed if these run out.
I had to pay for both the drawing and printing but I will set a sensible price for two head / seat tube badges and for four of the block Alan Shorter down / head tube lettering of £10-00 per set including UK postage. I will only supply against a frame number and if possible a photo of the frame they are to go on.
The block lettering is cut around all the letters as is the head badge around the outer edges and in the two small lower panels and will come with the transfer paper required to fix to the frame. You will need to attach the transfer paper to the decal and then carefully peel the decal off the backing so it is attached to the transfer paper, then position the decal on the frame and very carefully peel back the transfer paper ( do this as close to decal as possible do not hold it at right angles to the decal and pull upwards you need to roll it off. Once all in place a coat of clear will seal it against the weather. Do not tear the transfer paper as you apply the decal cut it with scissors if you tear it then all the little bits will stick to the decal and will make bumps when applied. I will do a proper set of instructions to go put with each set.
View attachment 503896
Hi Barr, I would be interested in a set of the early AWS decals also please