a.twiddler
Veteran
The Dawes Low Rider aka Batavus Relaxx aka Flevobike Basic Project
These bikes seem identical apart from the name and manufacturers logo. Even the colours are the same. So far seen pictures in metallic dark green, blue, black, and yellow. Built in Holland around 1995 -2000ish by Batavus who own the Dawes brand name. Some versions have cockpit type bars, others short straightish bars, as this one has. Either Flevobike owners are more likely to modify their bikes or there were more factory choices available from Flevo re gearing and other options.
I bought this on ebay at the beginning of July. It was well priced and I thought I could get it the way I wanted without too much work. I hadn’t seen it in person before I pulled the trigger but the photos showed it to be in good condition and the seller seemed genuine. He stated that it should be OK down to 29” inside leg for reach.

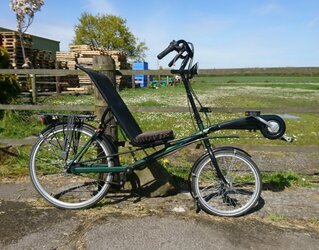
As bought.
Some thoughts. It’s a steel “urban recumbent” with some reviewers having used them successfully for long term commutes. It looks like a translation of a “Dutch Bike” into recumbent form. Designed for durability with a low maintenance 7 speed Nexus hub gear with single chainring (Grip shifter) and roller brakes. Also a Dutch type built in frame lock, bracket dynamo, rear carrier, full mudguards. It’s a less extreme, fairly upright recumbent (though with a low seat base). It looks a lot lower than the Linear. It possibly weighs more than the Linear!
First major problem. I couldn't reach the pedals! Tantalisingly my toes would reach but not my heels. Not enough adjustment in the boom to rectify this. Tried adjusting the boom but it wouldn't budge. Could probably bring it back 2cm but this won’t be enough. It has been soaked in oil as I would need to take it out and grease it anyway at some time but despite some careful hefty whacks it hasn’t moved. Meanwhile as the seat is non adjustable, I looked into some way of making a short seat rail to bring it forward, and into lengthening the rear seat supports as well.
I replaced the side stand with a short standard one as I found that the stop had broken off the rather elegant original. Shame, but cheap enough from Wilko. At least it is easier to work on now.
I spent several days trying to make some sort of seat rail but moving stuff forward just increases the seat height increasing the stepover, as well as leaving less space between the seat and steering stem. I removed all the seat rail gubbins and put everything back to standard.
I had a response on Cyclechat from @Yakboy. He has adapted a Low Rider to suit his wife who has 27-28” inside leg by using 140mm cranks and cutting the boom so it fully retracts, then grinding a bit from it. I was heartened to know that this is achievable.
In the meantime I continued with my efforts to remove the boom.
The boom still had a couple of cm to go back but was well and truly stuck for the time being. I didn’t think then that 2cm would make enough difference but I wasn’t able to confirm it until I’d unstuck the boom. This wasn’t intended to become a project, but as is the way of many things in life, it did.
Then followed a spell involving bigger and bigger hammers and lumps of wood, and more and more soaking in oil and solvents. I got hold of some plus gas. I drilled a tiny oil hole in the top of the frame mounted part of the boom and dripped some through, then at all the ends. I tried chilling the frame with cloths and ice cubes followed rapidly by boiling water. This all went on for over two weeks. Nothing showed any sign of moving.
Finally I bought a pair of ratchet straps. There is a pair of fruit trees in my garden. I looped one strap round one tree and the end of the boom, and the other one round the other tree and the steerer closest to the frame. There were plenty of cloths and padding. I taped a tough bit of foam to the frame alongside the boom and taped a bit of wood alongside with the end resting on the protruding bottom bracket.
I pulled the straps as tight as I could by hand then crick crick crick crick crick cri-c-k c--r--i--i--i--c--k as tight as I could possibly go. This I hoped would pull the bike lengthwise without bending anything. The trees were bowing, bits of bark and leaves were dropping.
I picked up the thing that I hadn’t tried up to now which was the SLEDGE HAMMER. I greatly feared that I would damage the trees (in which case Mrs Twiddler would kill me) or clumsily hit the frame and make it useless. The boom could have been stuck for 25 years for all I knew.
I carefully swung the hammer to get its swing right against the length of wood then pulled it back and struck with a hefy thwack. The frame went bonnggg and the trees shuddered and showered me with debris. Chips flew off the length of wood. I stood back to have a look. Nothing had moved, but neither did anything look damaged.
I took another careful measuring swing and gave it another thwack. This time it sounded different.
There was more of a hollow sound and the boom moved forward
I tried to move it by hand but it was too stiff. However a few light taps with a small hammer and piece of wood shifted it.
I took the bike and bits back into the garage, having disposed of the evidence. The fruit trees looked none the worse for wear, and the frame too had escaped any damage.


Views of the boom.
I was elated to have got the boom out, now I had to see what adjustments I could make with it.
I was surprised how short the part of the boom within the frame was, clearly marked with “maximum”. It was in good condition with intact paint and no corrosion. I removed 25mm from the inner end of the boom and tried fitting it flush to the end of the frame. The numbers still didn’t add up yet. Despite my original intention not to cut the frame, I removed 1 cm from the front ahead of the forward clamping bolt. I marked a curve to match the 40mm diameter of the bottom bracket and ground it out so I could refit it for a flush fit.
While looking at potential cranksets I decided to look at specialist websites for crank shorteners. My God! So expensive! Then I looked at Hollandbikeshop and saw they had some pretty cheap. So I ordered a set so I could experiment with different lengths. When they arrived I tried them attached to the original cranks and had two alternative lengths of about 150mm and 130mm plus the original 170mm. Even at 130mm I couldn’t get a heel with slightly bent knee on the pedal at the furthest part of the rotation. This was just bonkers! Went off in a gloomy mood.
Just out of interest I pinched one of Mrs T’s small bed cushions and tried it on the seat back. This low tech solution allowed me to reach the pedals with a bent knee at 130mm, and 150mm but not quite at 170mm.

Front view.
I pondered over the gearing options and found several mtb triples, new and used, available at silly prices on ebay. I thought if I would need shorter cranks anyway I may as well sort out gearing at the same time.

A view of the RH side and front end.
According to Sheldon Brown and other sources 150mm is about right for my height so as there was a good choice of these I took the plunge for a good condition used 24/34/42 for peanuts and at the same time bought a NOS Shimano front Derailleur for less than a fiver. I just happen to have a bit of 27.6 tubing to match it lying around but I will try everything out with manual changing before I go to the expense of getting the tube brazed to the boom. There may be other ways of attaching it more economically.
The original rear cog was 14t. By going to 19t based on Sheldon Brown’s Shimano 7 speed ratio information I would end up with a gear range from 20” to just shy of 90”. It would be nice to go higher but experience with the Linear has shown me the importance of lower gears.
The triple chainset arrived and was fitted. The reach with the cushion was workable. I tidied up the cut end of the frame so it looked presentable. I put back Mrs T’s fancy cushion and bought a cheap plain one with the same dimensions for bike use. I have since learned from @Yakboy that he used a mesh car seat lumbar support to increase the reach. This seemed a much better weatherproof solution which could be permanently attached and would blend in with the existing seat mesh. This would depend on finding one that was deep enough to suit. Meanwhile I had a vision of either carting a cushion about with me or leaving it attached to the bike and coming back and finding it missing. A bit awkward to cycle home without it. The bike came with a traditional style chainguard which I would have liked to keep but the 42T big chainwheel is too big for it so I’ve had to remove it. A pity, as it would potentially have helped prevent oil stains when manoevreing around things or on trains etc. A plastic chainring guard would reduce the circular saw appearance of the front end.
The Linear is practically silent apart from tyre noise . The Low rider is quite audible with its chain rollers and long chaintubes.
After spending an hour or so setting up the chain and rollers I decided that it might be cheaper to use a NOS rear derailleur with the limit screws adjusted to suit. There’s a convenient threaded hanger point on the rear dropout. So I ordered a NOS Shimano Tourney long arm RD with a suitable capacity to do the job. It ought to allow the chain to be self tensioning so I could try out manual front ring selection in the short term.
I reversed and inverted the bars which made it much more comfortable for me. After minor adjustments I managed to ride the bike up and down the garden path several times in a straightish line. The steering is hyper sensitive compared to the Linear and even with the wobbles there’s been no heel strike. Indeed I didn’t even realise it until I put the bike back in the garage and thought about it.

It was a huge morale booster as it was the first time I managed to ride it and it was a complete contrast to my first ride on the Linear. No intimations of imminent death, just get on and ride. Even the 26” bottom bracket height seemed less intimidating than I expected. By the Linear you have been well trained, young Paduan.

Left side view.
This bike has no suspension but after my positive experiences with the Linear I have fitted Big Apples front and rear not least because I already had a spare for the front in the garage. Mudguards needed tweaking but all works OK. The front one seems to be a rear one reversed to minimise splash upwards to the chainrings and pedals. This feature appears on photos of other Low Riders so seems to be a standard feature. An improvement on the missing or minimal mudguards found on many recumbents or indeed bikes in general
Well, the RD arrived but despite carefully setting it up it didn’t sit right with the limit screws, and wasn’t vertical despite the hanger being pristine. I tried plan B -a short length of gear cable through the adjuster which was screwed right in and clamped in the clamp bolt then adjusted via the adjuster screw. There was some play in the parallelogram. I have since read that dual pivot derailleurs are not the best for use as chain tensioners as running on the same cog all the time causes the top link to wear. It’s academic with this set up as the top pulley barely cleared the cog even with the B screw right in, so the pulley chattered.
I ordered a Shimano Alfine CT-S500 chain tensioner which arrived in quick time, now fitted and feels solid, and works OK. I’ve shortened the chain to match the tensioner and 19T sprocket.

Rear end and chain tensioner. I might be able to reduce the chain rollers to just 1. Some experimentation needed.
Brakes both adjusted, seem sharp enough. Cheapo bell and old mirror fitted. Test ride round the block completed. Need to experiment with tyre pressures as I can feel all the bumps unlike the Linear. Dynamo, lights and wiring removed, cycle computer fitted.
Now following a few minor tweaks I’m looking forward to the opporunity to take it for a decent test ride.
I haven’t got my head around the appearance yet. My steel tourer somehow just looks “right”. My Linear looks freakishly long but at least when it rolls up all the components arrive in the right order. My folding bike when folded looks like it has been in a terrible accident. This Low Rider looks like a conventional bike that's been dismantled and reassembled in the dark.
The protruding pedals at the front end seem determined to collide with everything else in the garage. I am going to keep a look out for folding bear trap pedals (if such a thing exists) which will make moving it about and storage a lot easier.
These bikes seem identical apart from the name and manufacturers logo. Even the colours are the same. So far seen pictures in metallic dark green, blue, black, and yellow. Built in Holland around 1995 -2000ish by Batavus who own the Dawes brand name. Some versions have cockpit type bars, others short straightish bars, as this one has. Either Flevobike owners are more likely to modify their bikes or there were more factory choices available from Flevo re gearing and other options.
I bought this on ebay at the beginning of July. It was well priced and I thought I could get it the way I wanted without too much work. I hadn’t seen it in person before I pulled the trigger but the photos showed it to be in good condition and the seller seemed genuine. He stated that it should be OK down to 29” inside leg for reach.
As bought.
Some thoughts. It’s a steel “urban recumbent” with some reviewers having used them successfully for long term commutes. It looks like a translation of a “Dutch Bike” into recumbent form. Designed for durability with a low maintenance 7 speed Nexus hub gear with single chainring (Grip shifter) and roller brakes. Also a Dutch type built in frame lock, bracket dynamo, rear carrier, full mudguards. It’s a less extreme, fairly upright recumbent (though with a low seat base). It looks a lot lower than the Linear. It possibly weighs more than the Linear!
First major problem. I couldn't reach the pedals! Tantalisingly my toes would reach but not my heels. Not enough adjustment in the boom to rectify this. Tried adjusting the boom but it wouldn't budge. Could probably bring it back 2cm but this won’t be enough. It has been soaked in oil as I would need to take it out and grease it anyway at some time but despite some careful hefty whacks it hasn’t moved. Meanwhile as the seat is non adjustable, I looked into some way of making a short seat rail to bring it forward, and into lengthening the rear seat supports as well.
I replaced the side stand with a short standard one as I found that the stop had broken off the rather elegant original. Shame, but cheap enough from Wilko. At least it is easier to work on now.
I spent several days trying to make some sort of seat rail but moving stuff forward just increases the seat height increasing the stepover, as well as leaving less space between the seat and steering stem. I removed all the seat rail gubbins and put everything back to standard.
I had a response on Cyclechat from @Yakboy. He has adapted a Low Rider to suit his wife who has 27-28” inside leg by using 140mm cranks and cutting the boom so it fully retracts, then grinding a bit from it. I was heartened to know that this is achievable.
In the meantime I continued with my efforts to remove the boom.
The boom still had a couple of cm to go back but was well and truly stuck for the time being. I didn’t think then that 2cm would make enough difference but I wasn’t able to confirm it until I’d unstuck the boom. This wasn’t intended to become a project, but as is the way of many things in life, it did.
Then followed a spell involving bigger and bigger hammers and lumps of wood, and more and more soaking in oil and solvents. I got hold of some plus gas. I drilled a tiny oil hole in the top of the frame mounted part of the boom and dripped some through, then at all the ends. I tried chilling the frame with cloths and ice cubes followed rapidly by boiling water. This all went on for over two weeks. Nothing showed any sign of moving.
Finally I bought a pair of ratchet straps. There is a pair of fruit trees in my garden. I looped one strap round one tree and the end of the boom, and the other one round the other tree and the steerer closest to the frame. There were plenty of cloths and padding. I taped a tough bit of foam to the frame alongside the boom and taped a bit of wood alongside with the end resting on the protruding bottom bracket.
I pulled the straps as tight as I could by hand then crick crick crick crick crick cri-c-k c--r--i--i--i--c--k as tight as I could possibly go. This I hoped would pull the bike lengthwise without bending anything. The trees were bowing, bits of bark and leaves were dropping.
I picked up the thing that I hadn’t tried up to now which was the SLEDGE HAMMER. I greatly feared that I would damage the trees (in which case Mrs Twiddler would kill me) or clumsily hit the frame and make it useless. The boom could have been stuck for 25 years for all I knew.
I carefully swung the hammer to get its swing right against the length of wood then pulled it back and struck with a hefy thwack. The frame went bonnggg and the trees shuddered and showered me with debris. Chips flew off the length of wood. I stood back to have a look. Nothing had moved, but neither did anything look damaged.
I took another careful measuring swing and gave it another thwack. This time it sounded different.
There was more of a hollow sound and the boom moved forward
I tried to move it by hand but it was too stiff. However a few light taps with a small hammer and piece of wood shifted it.
I took the bike and bits back into the garage, having disposed of the evidence. The fruit trees looked none the worse for wear, and the frame too had escaped any damage.
Views of the boom.
I was elated to have got the boom out, now I had to see what adjustments I could make with it.
I was surprised how short the part of the boom within the frame was, clearly marked with “maximum”. It was in good condition with intact paint and no corrosion. I removed 25mm from the inner end of the boom and tried fitting it flush to the end of the frame. The numbers still didn’t add up yet. Despite my original intention not to cut the frame, I removed 1 cm from the front ahead of the forward clamping bolt. I marked a curve to match the 40mm diameter of the bottom bracket and ground it out so I could refit it for a flush fit.
While looking at potential cranksets I decided to look at specialist websites for crank shorteners. My God! So expensive! Then I looked at Hollandbikeshop and saw they had some pretty cheap. So I ordered a set so I could experiment with different lengths. When they arrived I tried them attached to the original cranks and had two alternative lengths of about 150mm and 130mm plus the original 170mm. Even at 130mm I couldn’t get a heel with slightly bent knee on the pedal at the furthest part of the rotation. This was just bonkers! Went off in a gloomy mood.
Just out of interest I pinched one of Mrs T’s small bed cushions and tried it on the seat back. This low tech solution allowed me to reach the pedals with a bent knee at 130mm, and 150mm but not quite at 170mm.
Front view.
I pondered over the gearing options and found several mtb triples, new and used, available at silly prices on ebay. I thought if I would need shorter cranks anyway I may as well sort out gearing at the same time.
A view of the RH side and front end.
According to Sheldon Brown and other sources 150mm is about right for my height so as there was a good choice of these I took the plunge for a good condition used 24/34/42 for peanuts and at the same time bought a NOS Shimano front Derailleur for less than a fiver. I just happen to have a bit of 27.6 tubing to match it lying around but I will try everything out with manual changing before I go to the expense of getting the tube brazed to the boom. There may be other ways of attaching it more economically.
The original rear cog was 14t. By going to 19t based on Sheldon Brown’s Shimano 7 speed ratio information I would end up with a gear range from 20” to just shy of 90”. It would be nice to go higher but experience with the Linear has shown me the importance of lower gears.
The triple chainset arrived and was fitted. The reach with the cushion was workable. I tidied up the cut end of the frame so it looked presentable. I put back Mrs T’s fancy cushion and bought a cheap plain one with the same dimensions for bike use. I have since learned from @Yakboy that he used a mesh car seat lumbar support to increase the reach. This seemed a much better weatherproof solution which could be permanently attached and would blend in with the existing seat mesh. This would depend on finding one that was deep enough to suit. Meanwhile I had a vision of either carting a cushion about with me or leaving it attached to the bike and coming back and finding it missing. A bit awkward to cycle home without it. The bike came with a traditional style chainguard which I would have liked to keep but the 42T big chainwheel is too big for it so I’ve had to remove it. A pity, as it would potentially have helped prevent oil stains when manoevreing around things or on trains etc. A plastic chainring guard would reduce the circular saw appearance of the front end.
The Linear is practically silent apart from tyre noise . The Low rider is quite audible with its chain rollers and long chaintubes.
After spending an hour or so setting up the chain and rollers I decided that it might be cheaper to use a NOS rear derailleur with the limit screws adjusted to suit. There’s a convenient threaded hanger point on the rear dropout. So I ordered a NOS Shimano Tourney long arm RD with a suitable capacity to do the job. It ought to allow the chain to be self tensioning so I could try out manual front ring selection in the short term.
I reversed and inverted the bars which made it much more comfortable for me. After minor adjustments I managed to ride the bike up and down the garden path several times in a straightish line. The steering is hyper sensitive compared to the Linear and even with the wobbles there’s been no heel strike. Indeed I didn’t even realise it until I put the bike back in the garage and thought about it.
It was a huge morale booster as it was the first time I managed to ride it and it was a complete contrast to my first ride on the Linear. No intimations of imminent death, just get on and ride. Even the 26” bottom bracket height seemed less intimidating than I expected. By the Linear you have been well trained, young Paduan.
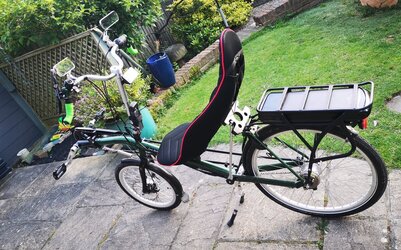
Left side view.
This bike has no suspension but after my positive experiences with the Linear I have fitted Big Apples front and rear not least because I already had a spare for the front in the garage. Mudguards needed tweaking but all works OK. The front one seems to be a rear one reversed to minimise splash upwards to the chainrings and pedals. This feature appears on photos of other Low Riders so seems to be a standard feature. An improvement on the missing or minimal mudguards found on many recumbents or indeed bikes in general
Well, the RD arrived but despite carefully setting it up it didn’t sit right with the limit screws, and wasn’t vertical despite the hanger being pristine. I tried plan B -a short length of gear cable through the adjuster which was screwed right in and clamped in the clamp bolt then adjusted via the adjuster screw. There was some play in the parallelogram. I have since read that dual pivot derailleurs are not the best for use as chain tensioners as running on the same cog all the time causes the top link to wear. It’s academic with this set up as the top pulley barely cleared the cog even with the B screw right in, so the pulley chattered.
I ordered a Shimano Alfine CT-S500 chain tensioner which arrived in quick time, now fitted and feels solid, and works OK. I’ve shortened the chain to match the tensioner and 19T sprocket.
Rear end and chain tensioner. I might be able to reduce the chain rollers to just 1. Some experimentation needed.
Brakes both adjusted, seem sharp enough. Cheapo bell and old mirror fitted. Test ride round the block completed. Need to experiment with tyre pressures as I can feel all the bumps unlike the Linear. Dynamo, lights and wiring removed, cycle computer fitted.
Now following a few minor tweaks I’m looking forward to the opporunity to take it for a decent test ride.
I haven’t got my head around the appearance yet. My steel tourer somehow just looks “right”. My Linear looks freakishly long but at least when it rolls up all the components arrive in the right order. My folding bike when folded looks like it has been in a terrible accident. This Low Rider looks like a conventional bike that's been dismantled and reassembled in the dark.
The protruding pedals at the front end seem determined to collide with everything else in the garage. I am going to keep a look out for folding bear trap pedals (if such a thing exists) which will make moving it about and storage a lot easier.