
You are using an out of date browser. It may not display this or other websites correctly.
You should upgrade or use an alternative browser.
You should upgrade or use an alternative browser.
Calling all model kit fans - she's finally done
- Thread starter captain nemo1701
- Start date
Page may contain affiliate links. Please see terms for details.
Illaveago
Legendary Member
- Location
- Chippenham,Wiltshire.
My dad said that he liked the Churchill tank, he wasn't in them, he was a R.A.S.C. driver. He used to tell us about a Churchill tank which they had to leave on a mountain somewhere in Italy as it had got stuck. They couldn't move it forwards or backwards and so they left it there. He often wondered if it was still there.The wonderfull David Fletcher of the tank museum has done a terrific series of "tank chats" on youtube, the most recent covering the various "funnies" many based on the Churchil. He's also written a superb book on the Churchill too, but sadly only passing mention of the "funnies" - but to be fair it's a big thick, well illustrated and well researched book as it is. We can hope for a follow up maybe
Joey Shabadoo
My pronouns are "He", "Him" and "buggerlugs"
The Germans weren't impressed with the Churchill tanks left behind at Dieppe -
“The Germans compared the Churchill not only to their own tanks but to the Russian machines they were now encountering in the east. And it did not compare favourably. The vehicle' says the report 'offers nothing worthy of consideration by technical personnel, nor has it any new constructive features either in the metallurgical field, or in the field of weapon technology'. The 3 inch howitzer was 'bad and old fashioned'; the 2-pounder 'left behind both in construction and effectiveness' while the 6-pounder's performance 'does not approach that of Russian guns of the same calibre'. Ammunition revealed no new or noteworthy features and, as for armour it was seen as very thick but of poor quality and did not compare well with German or Russian plate. They also claimed that the tracks were brittle and of clumsy design which fractured ev ery time it received a direct hit. Photographs seem to indicate that the Churchills abandoned at Dieppe had the heavy, studded cast track made from a material described as B.T.S. 3. Discussing performance the Germans noted that the tracks made so much noise that they believed it would be impossible for anyone to use the radio while the tank was moving. No similar complaint is heard from British sources but the Germans made the point that when the tank halted to use its radio it provided a good opportunity to knock it out. Not that this was regarded as a problem. As the report sums up ' The shape is also not modern. In conclusion it may be said that the English Churchill tank, in its present form, is easy to combat'.”
“The Germans compared the Churchill not only to their own tanks but to the Russian machines they were now encountering in the east. And it did not compare favourably. The vehicle' says the report 'offers nothing worthy of consideration by technical personnel, nor has it any new constructive features either in the metallurgical field, or in the field of weapon technology'. The 3 inch howitzer was 'bad and old fashioned'; the 2-pounder 'left behind both in construction and effectiveness' while the 6-pounder's performance 'does not approach that of Russian guns of the same calibre'. Ammunition revealed no new or noteworthy features and, as for armour it was seen as very thick but of poor quality and did not compare well with German or Russian plate. They also claimed that the tracks were brittle and of clumsy design which fractured ev ery time it received a direct hit. Photographs seem to indicate that the Churchills abandoned at Dieppe had the heavy, studded cast track made from a material described as B.T.S. 3. Discussing performance the Germans noted that the tracks made so much noise that they believed it would be impossible for anyone to use the radio while the tank was moving. No similar complaint is heard from British sources but the Germans made the point that when the tank halted to use its radio it provided a good opportunity to knock it out. Not that this was regarded as a problem. As the report sums up ' The shape is also not modern. In conclusion it may be said that the English Churchill tank, in its present form, is easy to combat'.”
OP
OP
captain nemo1701
Space cadet. Deck 42 Main Engineering.
- Location
- Bristol

OP
OP
captain nemo1701
Space cadet. Deck 42 Main Engineering.
- Location
- Bristol
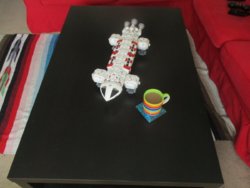
Went to the International Plastic Model Show last year and had a wee splurge. The tiny flying sub comes with the big Seaview kit.

Andy in Germany
Legendary Member
- Location
- Rottenburg am Neckar
I’m rather better at starting a project than finishing it, so you can imagine the excitement this week when the Steam Powered Tank was finally completed.

Part of the problem was that I'd tried to paint the tank a blueish grey, but that came out more ‘Teutonic’ than ‘generic’ as intended. I also forgot that with a dark topcoat the underlying ‘rust’ didn’t contrast very well. On the other hand I found the Hairspray method used with an old toothbrush is startlingly effective, rather too effective in fact.
So, once again, it was back to the primer, ‘rust’ layer, varnish, hairspray; and after completely overthinking things as usual, a sandy green topcoat. I rubbed this off with a paintbrush this time to avoid great slabs of rust, then completely failed to ‘ink’ the cracks with black ink, as usual.

The Boiler end would probably be filthy from clearing out the ash, so this got a scumbling of black, then a very light drybrushing of white and silver in an attempt to make the milk bottle cap look like it was made of metal. The worst mistakes made so far were covered by several shades of pastel powders for general road dirt, and as an experiment I rubbed a soft pencil on some of the exposed ‘metal’ surfaces.

I’m still wondering if I should add brass on some of the pipes: on the one hand it seems silly because that would ruin the ‘camouflage’ effect but I’ve never let logic stop me before…

Part of the problem was that I'd tried to paint the tank a blueish grey, but that came out more ‘Teutonic’ than ‘generic’ as intended. I also forgot that with a dark topcoat the underlying ‘rust’ didn’t contrast very well. On the other hand I found the Hairspray method used with an old toothbrush is startlingly effective, rather too effective in fact.
So, once again, it was back to the primer, ‘rust’ layer, varnish, hairspray; and after completely overthinking things as usual, a sandy green topcoat. I rubbed this off with a paintbrush this time to avoid great slabs of rust, then completely failed to ‘ink’ the cracks with black ink, as usual.
The Boiler end would probably be filthy from clearing out the ash, so this got a scumbling of black, then a very light drybrushing of white and silver in an attempt to make the milk bottle cap look like it was made of metal. The worst mistakes made so far were covered by several shades of pastel powders for general road dirt, and as an experiment I rubbed a soft pencil on some of the exposed ‘metal’ surfaces.
I’m still wondering if I should add brass on some of the pipes: on the one hand it seems silly because that would ruin the ‘camouflage’ effect but I’ve never let logic stop me before…
Watch Tom Grigat's videos on that You Tube. He uses Marmite to get a rust effect. He's taught me such a lot but is so intricate, particularly with his rigging on bi-planes, you just feel like giving up because he's so blinking good. I see surgeons operate every working day with less skill than Tom!I’m rather better at starting a project than finishing it, so you can imagine the excitement this week when the Steam Powered Tank was finally completed.
View attachment 454313
Part of the problem was that I'd tried to paint the tank a blueish grey, but that came out more ‘Teutonic’ than ‘generic’ as intended. I also forgot that with a dark topcoat the underlying ‘rust’ didn’t contrast very well. On the other hand I found the Hairspray method used with an old toothbrush is startlingly effective, rather too effective in fact.
So, once again, it was back to the primer, ‘rust’ layer, varnish, hairspray; and after completely overthinking things as usual, a sandy green topcoat. I rubbed this off with a paintbrush this time to avoid great slabs of rust, then completely failed to ‘ink’ the cracks with black ink, as usual.
View attachment 454314
The Boiler end would probably be filthy from clearing out the ash, so this got a scumbling of black, then a very light drybrushing of white and silver in an attempt to make the milk bottle cap look like it was made of metal. The worst mistakes made so far were covered by several shades of pastel powders for general road dirt, and as an experiment I rubbed a soft pencil on some of the exposed ‘metal’ surfaces.
View attachment 454315
I’m still wondering if I should add brass on some of the pipes: on the one hand it seems silly because that would ruin the ‘camouflage’ effect but I’ve never let logic stop me before…
View attachment 454316
Illaveago
Legendary Member
- Location
- Chippenham,Wiltshire.
It looks very good . What scale is it ?I’m rather better at starting a project than finishing it, so you can imagine the excitement this week when the Steam Powered Tank was finally completed.
View attachment 454313
Part of the problem was that I'd tried to paint the tank a blueish grey, but that came out more ‘Teutonic’ than ‘generic’ as intended. I also forgot that with a dark topcoat the underlying ‘rust’ didn’t contrast very well. On the other hand I found the Hairspray method used with an old toothbrush is startlingly effective, rather too effective in fact.
So, once again, it was back to the primer, ‘rust’ layer, varnish, hairspray; and after completely overthinking things as usual, a sandy green topcoat. I rubbed this off with a paintbrush this time to avoid great slabs of rust, then completely failed to ‘ink’ the cracks with black ink, as usual.
View attachment 454314
The Boiler end would probably be filthy from clearing out the ash, so this got a scumbling of black, then a very light drybrushing of white and silver in an attempt to make the milk bottle cap look like it was made of metal. The worst mistakes made so far were covered by several shades of pastel powders for general road dirt, and as an experiment I rubbed a soft pencil on some of the exposed ‘metal’ surfaces.
View attachment 454315
I’m still wondering if I should add brass on some of the pipes: on the one hand it seems silly because that would ruin the ‘camouflage’ effect but I’ve never let logic stop me before…
View attachment 454316
Andy in Germany
Legendary Member
- Location
- Rottenburg am Neckar
It looks very good . What scale is it ?
Thank you.
It's theoretically 1:55, or what tabletop gamers cal '28mm' scale, but bearing in mind it's e complete work of fiction and uses tracks and small detail parts nicked from a 1:48 Russian tank, it's not exactly "fine modelmaking", more "If it looks half right..."
Joey Shabadoo
My pronouns are "He", "Him" and "buggerlugs"
Au contraire, I think it's exceptional!
Illaveago
Legendary Member
- Location
- Chippenham,Wiltshire.
It is no
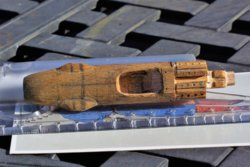
 where near finished but it is coming on . I was a bit bored waiting for my parcel so I thought I would do some more whittling!
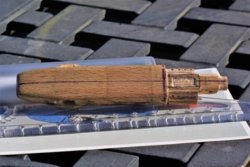
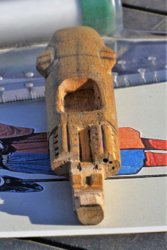
I have been working on the engine and gearbox a bit . I cut one bank of cylinders back to give the V8 staggered look. I also undercut the areas underneath the exhaust manifolds to give the engine a bit more definition and cut down the gearbox a bit.
Eventually when I finish it I would like to make a mould from it so that I could make some more.
Attachments
Andy in Germany
Legendary Member
- Location
- Rottenburg am Neckar
That's very impressive @Illaveago: Getting beechwood to cut that neatly and accurately requires a steady hand and some very sharp cutting instruments. I doff my cap to you sir.
Illaveago
Legendary Member
- Location
- Chippenham,Wiltshire.
Thanks ! I recycle old chair legs wherever possible .That's very impressive @Illaveago: Getting beechwood to cut that neatly and accurately requires a steady hand and some very sharp cutting instruments. I doff my cap to you sir.
It is a Lotus 49/ 49B . My plan is to eventually make some suspension components .
Vapin' Joe
Formerly known as Smokin Joe
- Location
- Bare headed cyclist, Smoker
I'd love to see that when you finish it. That was my favourite F1 car.Thanks ! I recycle old chair legs wherever possible .
It is a Lotus 49/ 49B . My plan is to eventually make some suspension components .
biggs682
Itching to get back on my bike's
- Location
- Northamptonshire
Thanks ! I recycle old chair legs wherever possible .
It is a Lotus 49/ 49B . My plan is to eventually make some suspension components .
I can't wit to see this as a finished item