GT Timberline Service

Page may contain affiliate links. Please see terms for details.
A friend’s husband died of cancer last year, so to help out I’ve offered to keep her bikes serviced for her.

Her road bike is not a problem as it’s similar to mine with Shimano 11 speed and I have all the tools and experience necessary.

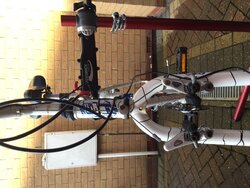
She dropped her mountain bike off the other day which is a little trickier. At first I thought it was a BSO but, after a little investigation, realise it was probably half decent in it’s day.

I think it’s a 1992 GT Timberline.

05764D30-3B4A-49E1-88CE-8420884648FE.jpeg

It seems to have a mix of Shimano Exage 500LX and 300LX kit on it and, rather bizarrely, two different types of brakes.
B2FD9A01-AC4D-4282-998E-671B721F752F.jpeg

EE9A6BBD-CF61-4F37-8AF3-E09D8C1D949A.jpeg


I don’t really want to do a full resto on it, just make it safe and roadworthy. Change the brake blocks and cables, replace the BB which seems to be knackered, and get the gears changing nicely.

I’ll probably be asking you guys a few silly questions along the way. Here’s the first one...

Is this the correct tool for removing the cranks? I guess I undo the nuts using the socket and then screw the other part of the tool in to draw the cranks off the square drive?
B2D804A5-C0C5-425B-9CD7-F63C91532694.jpeg


What is the BB likely to look like? Will it be a sealed unit like a bb-un55, or a separate crank with two bearing races?

Here’s some more piccys...

EE08983A-BFC7-4996-A7D1-25EF46CF4001.jpeg

F564FC61-8EF1-4729-AFF4-229F795DC762.jpeg

0BCA6723-929C-402F-A937-1281EF42F0DC.jpeg

31EBBC64-CBA6-4B86-8FA9-5E752F378875.jpeg
 

Attachments

  • 52A67946-72B6-498F-9DB9-BB578AC2B770.jpeg
    52A67946-72B6-498F-9DB9-BB578AC2B770.jpeg
    63.2 KB · Views: 4
That looks like the correct crank tool.
Screw back the silver piece in the middle so it doesn't protrude. Screw the black part into the crank as far as it will go. Then screw the silver bit in and the protruding bit will force the crank off. Might need a bit of oomph! Think you will need a 15mm spanner.

BB looks like it will be UN55 or similar. You will need a tool for that and remember drive side is LH thread so it unscrews the wrong way. Details of size should be printed on it.

Edit....yes, remove the crankbolts first. Seems obvious but these days everything had to be spelled out🙄
14mm socket needed. It might be an idea to replace them with either Allen key bolts or self extracting bolts. Either costs peanuts from the Bay of Eeeees.
 
Last edited:

Jody

Stubborn git
Its all original, bar the saddle and grips. Shouldn't take much to tidy back up.

They ran that type of u brake for a few years and were absolutely useless.
 

Cycleops

Legendary Member
Location
Accra, Ghana
You might not need that crank tool. Those ST ones can go on for intergalactic mileages. Push the cranks to feel for any play. Likely to be a sealed unit so nothing to do, only replace if knackered.

Doesn't look like there's too much wrong with it.
 

Gunk

Guru
Location
Oxford
I agree with @Cycleops if it’s smooth and there’s no play just leave it alone. It’s really easy to strip the crankset threads with those cheap Chinese removal tools so if possible I would leave the BB alone.
 
  • Like
Reactions: C R
OP
OP
Tenacious Sloth
Location
Huntingdon, UK
You might not need that crank tool. Those ST ones can go on for intergalactic mileages. Push the cranks to feel for any play. Likely to be a sealed unit so nothing to do, only replace if knackered.

Doesn't look like there's too much wrong with it.
I agree with @Cycleops if it’s smooth and there’s no play just leave it alone. It’s really easy to strip the crankset threads with those cheap Chinese removal tools so if possible I would leave the BB alone.

Guys. Thanks, but I did mention in my OP that the BB seems to be knackered. There is about 3-4mm play at the end of the cranks.

I’m suspecting it may not be a sealed unit, as theres one of those knurled jobbers at the left side with cutouts for a c-spanner.
 

Ajax Bay

Guru
Location
East Devon
In my view the crank tool will be fine.
This should remove the BB for you.
I think I spy a notch in the left side of the BB, but an image would confirm. If so the 20 spline tool DJ shared will not be required. Either a C-spanner or a screwdriver and mallet. Right hand side: can't tell though it'll be clear once the OP whips off the chainset. Quite likely with that year of bike it's cup and cone, imo. In which case a good clean and plenty of grease might be what's needed. But a UN-300 (replaced UN-55, same quality) BB will fit nicely (and then of course you will need the DJ tool). Easiest to measure the BB spindle once out. Quite likely 122.5mm. Similarly looks like a 68mm but could be 73mm BB width.
Two other observations for the OP to consider:
1) Both those brakes are pretty useless at stopping a bike, if that matters. Test it and see.
2) The QR lever is in the wrong way and also it's an exposed cam skewer which is less assured than the enclosed cam version.
For pictures see: https://www.cyclechat.net/threads/f...tually-works-loose.272293/page-2#post-6320832
https://sheldonbrown.com/skewers.html
 
OP
OP
Tenacious Sloth
Location
Huntingdon, UK
In my view the crank tool will be fine.

I think I spy a notch in the left side of the BB, but an image would confirm. If so the 20 spline tool DJ shared will not be required. Either a C-spanner or a screwdriver and mallet. Right hand side: can't tell though it'll be clear once the OP whips off the chainset. Quite likely with that year of bike it's cup and cone, imo. In which case a good clean and plenty of grease might be what's needed. But a UN-300 (replaced UN-55, same quality) BB will fit nicely (and then of course you will need the DJ tool). Easiest to measure the BB spindle once out. Quite likely 122.5mm. Similarly looks like a 68mm but could be 73mm BB width.
Two other observations for the OP to consider:
1) Both those brakes are pretty useless at stopping a bike, if that matters. Test it and see.
2) The QR lever is in the wrong way and also it's an exposed cam skewer which is less assured than the enclosed cam version.
For pictures see: https://www.cyclechat.net/threads/f...tually-works-loose.272293/page-2#post-6320832
https://sheldonbrown.com/skewers.html

Thanks for that, I think you’re going to be pretty much spot on about the BB. I’ll probably have a look at it later this afternoon after my ride.

My wife has decreed that she’ll be joining me, so I’ll have the once a year faff getting her Dawes Stirling down from it’s hooks in the rafters to remove the dust and pump the tyres up etc. I’ve tried explaining that she will find cycling hurts her backside if she only does it once a year, but hey ho!

I’ll set the brakes up as well as I can on the GT and see what’s what. One of the cantilevers is currently very stiff on it’s post and barely moving, so I think a thorough remove, clean, lubricate, refit and adjustment is in order. As for the back brake, it’s a bit of a monstrosity and I can’t see how it was ever much good even when new, but I’ll see what I can do about it.

Are you talking about the QR on the seat post? It’s loose at the moment from where I checked that I could move the seatpost.

Brake blocks seem to have loads of meat left. I wouldn't be replacing those just for the sake of it, just make sure they are hitting the rims correctly.

Don't be tempted to tear into the bike too deeply, just repair/adjust what is needed and leave the rest alone or else you risk introducing problems.

Yeah. I’m with you all the way on this. If the BB isn’t a sealed unit I may not have to order any spare parts at all. If I end up having to order a new one though, then I may order some better quality blocks in an effort to improve the braking. Will see how good I can get them with just adjustment first though. Will also give the blocks a quick rub with some wet and dry.

Anyway guys, thanks for your input so far.
 

Ajax Bay

Guru
Location
East Devon
QR is the rear axle QR.
Those are biopace rings and I have that chainset, removed from an early 90s bike. Think the cup and cone BB was 122mm spindle length.
 
OP
OP
Tenacious Sloth
Location
Huntingdon, UK
QR is the rear axle QR.
Those are biopace rings and I have that chainset, removed from an early 90s bike. Think the cup and cone BB was 122mm spindle length.

Ah, I think you may be looking at the QR on my chainkeeper in the photo of the rear derailleur?

Anyway, had a quick play (in my dressing gown :headshake:) this morning and managed to get the BB out. Once I remembered about the LHT on the drive side. :whistle:
D8398BF1-C272-45A8-864D-45291FB5ECED.jpeg

F02BBB23-D188-401F-B098-7AAD010AFCF7.jpeg


Hopefully a clean and regrease will do the job.

The frame shell is 68mm and the axle seems to be approximately 118mm, although I’ll have to wait until I’ve given it a clean to get the verniers on it. I’m assuming that the measurement is taken from the ends of the square drives? Here’s a very misleading photo, I know it doesn’t look it from the picture with the shadows, but I’m fairly sure its 118mm or thereabouts.
527DC83A-03C0-4526-9481-E4BBAC01889B.jpeg

I probably won’t need one (difficult to tell until I’ve got everything cleaned up), but I did have a quick google for a 68/118mm sealed unit but couldn’t seem to find one.

Any recommendations on the easiest reassembly order for the axle and bearings/end caps?
[Found this excellent Park Tools video:]


View: https://youtu.be/sEv8irsdQI8
 
Last edited:

Big John

Guru
Now you've gone to the trouble of removing the old bb I'd just fit a sealed unit in its place. You don't have to pay the earth. We sell them at the bike charity for about a tenner new. 118 is a popular size so shouldn't be hard to get. Fit and forget 👍
 
Top Bottom