I have a Planet X RT-58, which I am very pleased with. I live in Sweden and during the winter I do not ride my bike outdoors. I thought it would be a great oppurtunity the give it a good clean and proper service.
Among other things, I therefore took of the complete drive train and bottom bracket etc. After I cleaned it I started to assemble it again. However, I do not think I managed to assemble it correctly. I have taken it apart again and again but it seems there is no other way to assemble it.
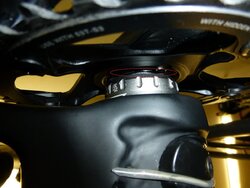
Here´s the thing (or is it perhaps not a problem???). There is a little gap between the inner side of the crankset (the spacer) and the bottom bracket on the drive side, maybe approximately 1-2 mm. I don´t think it was like that before I started "my work". I.e it seems the whole crankset is now 1-2 mm more to the right (looking at it from above). I realise now of course I should have double checked everything before I took it all apart but it is too late for that now.
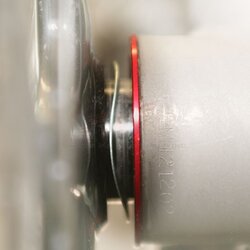
Is there anyone out there with a Planet X RT-58 (or anyone else with a BSA GXP bottom bracket) that can help me? If so, can you take a photo of your bike/crankset (close up from above the crankset/chain ring which shows the bottom bracket and the thin spacer) so I can see what it should look like (gap or no gap?)?
Anyway, thanks in advance.
BR
//martejo77
Among other things, I therefore took of the complete drive train and bottom bracket etc. After I cleaned it I started to assemble it again. However, I do not think I managed to assemble it correctly. I have taken it apart again and again but it seems there is no other way to assemble it.
Here´s the thing (or is it perhaps not a problem???). There is a little gap between the inner side of the crankset (the spacer) and the bottom bracket on the drive side, maybe approximately 1-2 mm. I don´t think it was like that before I started "my work". I.e it seems the whole crankset is now 1-2 mm more to the right (looking at it from above). I realise now of course I should have double checked everything before I took it all apart but it is too late for that now.
Is there anyone out there with a Planet X RT-58 (or anyone else with a BSA GXP bottom bracket) that can help me? If so, can you take a photo of your bike/crankset (close up from above the crankset/chain ring which shows the bottom bracket and the thin spacer) so I can see what it should look like (gap or no gap?)?
Anyway, thanks in advance.
BR
//martejo77