Van projects

Page may contain affiliate links. Please see terms for details.
OP
OP
JhnBssll

JhnBssll

Veteran
Location
Suffolk
As I have mentioned previously I've started amassing parts for a bike wash install. Today I stripped down the broken Bosch Fontus low pressure cleaner and harvested all the useful bits. Here's what I'm left with...

20220727_212314.jpg


The over-wheel arch tank has also arrived...

20220727_212759.jpg


I've also pinched a handfull of resistors that I'll need to trick the electronics in to operating without a proper Bosch battery attached - theres a coding resistor and an NTC (heat sensor) inside the batteries which the electronics check are connected before they'll activate. By connecting those pins to ground with the correct resistors you can recreate a plausible signal and trick them in to thinking it's connected to a battery and then feed in an external +19V to power it, which in my case will be provided by this nifty little DC-DC converter hooked up to the leisure battery...

20220727_215843.jpg


I'm not sure when I'll get a chance to start playing with these bits and working out where best to put them all but I'm already looking forward to it :laugh:
 

Gunk

Guru
Location
Oxford
Look forward to seeing how this is going to come together.
 
OP
OP
JhnBssll

JhnBssll

Veteran
Location
Suffolk
OK so I've had a closer look at things this evening and made some progress.

Looking at the pump assembly I decided the best plan of action was to cut the pipe along the red line in the image below, seperating the pump from the outlet and pressure sensor circled in yellow...

20220728_175520.jpg


With this done, the pump assembly fits rather nicely in the little cubby hole...

20220728_175959.jpg


I've ordered some high pressure hose and clips to attach the two ends of pipe back together again when I've worked out where I'm going to have the outlet :smile: I'll probably also have to extend the cables to the pressure sensor but that's easily done.

Looking at where the wiring sits it seems sensible to have all the electronics above the cubby hole near the light dimmer switch - in the region where the control panel is resting below, but probably slightly higher...

20220728_180113.jpg


With this worked out I decided to get the soldering iron out and see if I could bring the electronics to life. Following the instructions I'd received from a colleague at work I soon had the resistors and power supply soldered to the battery connector terminals...

20220728_193408.jpg


I'd already got power to that corner of the van so it was a quick job connecting 12V to the DC-DC converter and trying it out... Great success!

20220728_195810.jpg


20220728_195818.jpg


I've called it a day there and whipped it all out again, next job is to permanently mount and wire it all before I think about plumbing it up and fitting the water tank :okay: One last job I did when it was removed again was to seal the new soldered connections with some mastic to try and protect the joints from any strain, I don't want them cracking or coming apart.
20220728_202441.jpg
 
OP
OP
JhnBssll

JhnBssll

Veteran
Location
Suffolk
I've mounted the pump, DC-DC converter, electronics and water tank this afternoon 😊 Nothing is plumbed together as yet though.

20220729_172321.jpg


20220729_181535.jpg


I've modified one of the fittings that came with the tank to act as a pickup by fixing a tube in to it with sikaflex, I'll drill a suitable hole in the top of the tank and fix this in place and cut a few slots out of the tube bottom so it can't suck itself to the tank walls. This means I won't have to make any holes below the waterline so less chance of leaks :okay:

20220729_183557.jpg
 
OP
OP
JhnBssll

JhnBssll

Veteran
Location
Suffolk
Forgot to update this - we had a bout of the dreaded 'rona in the Bssll household last week but all better now 😄

I've got the bike wash all up and running :okay:

20220805_151629.jpg


20220805_151638.jpg


20220805_155239.jpg


It all needs tidying up still but you know me well enough by now to know that this will happen when I feel like it, and not before :laugh:
 
OP
OP
JhnBssll

JhnBssll

Veteran
Location
Suffolk
I've tidied it up a bit :laugh: It only took 2 months to get round to it, and the thing that finally forced my hand was the fact that I'd hidden the light switches behind the new panel and I'm night riding a lot lately which has meant putting the bike away in the dark by head torch :laugh: So panel off, holes cut and switches mounted, then a bit of storage for the hose and other bits added :okay:

20221007_183759.jpg


I've ordered a couple of LED lights to fit to the top of the rear doors on the inside, so that when they're open they will illuminate the ground outside nicely so I can see what I'm doing :okay: Once they arrive I'll run some cable in to each door and probably fit the switches in the removable panels at the bottom.

I've also got a few USB sockets on the way with the idea being I can keep a Di2 and AXS charger in the back so I can charge those bikes as and when needed. I've got a spare AXS battery so will likely make a little cubbyhole to store that in, along with other bits and bobs :okay:
 

Jameshow

Veteran
I've tidied it up a bit :laugh: It only took 2 months to get round to it, and the thing that finally forced my hand was the fact that I'd hidden the light switches behind the new panel and I'm night riding a lot lately which has meant putting the bike away in the dark by head torch :laugh: So panel off, holes cut and switches mounted, then a bit of storage for the hose and other bits added :okay:

View attachment 663724

I've ordered a couple of LED lights to fit to the top of the rear doors on the inside, so that when they're open they will illuminate the ground outside nicely so I can see what I'm doing :okay: Once they arrive I'll run some cable in to each door and probably fit the switches in the removable panels at the bottom.

I've also got a few USB sockets on the way with the idea being I can keep a Di2 and AXS charger in the back so I can charge those bikes as and when needed. I've got a spare AXS battery so will likely make a little cubbyhole to store that in, along with other bits and bobs :okay:

Got your priorities right there bike wash and TV!

Where's the beer fridge?!!!
 
OP
OP
JhnBssll

JhnBssll

Veteran
Location
Suffolk
Lights and LED sockets arrived this morning, I've managed to get the lights fitted and working but ran out of time to do the sockets so they'll have to wait for another day :laugh:

I'm quite pleased with the install, I fitted one light to the top of each rear door wired to a single switch in the drivers side rear door pocket - this one opens first and closes last so it made sense to switch the lights from here.

20221010_184740.jpg


20221010_184732.jpg


Here they are switched on:

20221010_190213.jpg


And again after a bit of a clean up and the bike carrier refitted

20221010_191526.jpg


I'm out riding tomorrow night so shall see how they perform :laugh:
 

Venod

Eh up
Location
Yorkshire
This tuned u on my Facebook feed.

Rubbish photograph of a decent van. This was my ex GPO J van which I converted to four wheel drive back around 1970-ish. It was originally fitted with the 1500 cc ohv B Series engine which I retained for a while using a remote transfer case but in my quest for a bit more power I eventually fitted a 2.2 Austin Gipsy engine complete with integral transfer case. A bit mad but an interesting exercise.
View attachment 329736857_851098452846534_652860066477386467_n.jpg
 
OP
OP
JhnBssll

JhnBssll

Veteran
Location
Suffolk
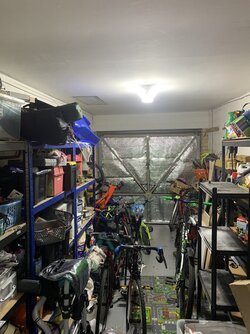
Another van upgrade completed - My partner has 3 girls and theyve started to enjoy riding their bikes a bit more so we needed a method of moving 5 bikes around. I can squeeze them all in the van, but not without the risk of damaging them, so decided a tow bar and rack was needed... Of course I couldn't stop there...

20230828_181840.jpg


20230828_163636.jpg


20230828_171038.jpg


We can now fit 4 bikes on the back and two inside without risk of damage to any of them, plus the rack can be swung out of the way to retain access to both rear van doors. Nifty!
 
Another van upgrade completed - My partner has 3 girls and theyve started to enjoy riding their bikes a bit more so we needed a method of moving 5 bikes around. I can squeeze them all in the van, but not without the risk of damaging them, so decided a tow bar and rack was needed... Of course I couldn't stop there...

View attachment 704534

View attachment 704536

View attachment 704535

We can now fit 4 bikes on the back and two inside without risk of damage to any of them, plus the rack can be swung out of the way to retain access to both rear van doors. Nifty!

Have you tried swinging that out of the way when it's loaded up with bikes? It looks like a lot of leverage on that joint.

Mind you, having looked at the van and other great work you've done, I'm sure you've a well considered solution/answer. :okay:
 
OP
OP
JhnBssll

JhnBssll

Veteran
Location
Suffolk
Have you tried swinging that out of the way when it's loaded up with bikes? It looks like a lot of leverage on that joint.

Mind you, having looked at the van and other great work you've done, I'm sure you've a well considered solution/answer. :okay:

I havent tried it yet, I didn't make the swing arm though it was bought off a guy that fabricates things for campers :smile: It has a couple of bearings in the pivot and the lower bearing seat is adjustable to take up any misalignment when theres weight applied. Should be good :okay:
 
Top Bottom