1940s Raleigh rescue - Should I or shouldn't I?

Page may contain affiliate links. Please see terms for details.

broadway

Veteran
Also had a crack at the saddle on the older bike - scrubs up quite nicely. I still don't see why anyone would want to sit on one of these things when you could have chosen a nice B17 instead from the Raleigh catalogue at the time ;) But I will give it a go!
10805576_10100984787510099_8298736438893621982_n.jpg


A B66 would have been the appropriate choice for a roadster
blogger-image--1820450782.jpg
 
OP
OP
ChrisEyles

ChrisEyles

Guru
Racing green eh? I was excited to see the finished product before, even more so now!

Your call obviously, but I think that picking out details on the lugs with a rich cream colour would look stunning.

Rustoleum's idea of racing green looks to be a couple of shades lighter than my ideal, but hopefully should do the job :smile:

Cream detail on the lugwork is a great idea (I was going to outline in gold, but think this would look much sharper)... however, the plan at the moment is to sell off the newer frame to finance building up the older one, and unfortunately the older frame has very basic, undecorative lugs... I'll have to mull this one over.

Enjoying this resto, keep posting the updates please.

Thanks :smile: and will do!

Quick question - what do people find the easiest way to support/rest a frame (and mudguards) when painting them? I guess the best way should be to hang the frame by a rope run through the head tube, that way you can get to everything easily?
 
OP
OP
ChrisEyles

ChrisEyles

Guru
Started the paint job on the newer frame today :smile:

P1010519.JPG P1010516.JPG P1010517.JPG

P1010515.JPG P1010518.JPG

Did a lot of careful masking of the head bagdge, headset and BB... hopefully not too much paint got underneath!

That Rustoleum is lovely and easy to work with, thanks again for the recommendation. Up close it looks like the finish will turn out perfectly acceptable (if a long way from perfect, thanks to my lacklustre preparation in the sanding stage).

Going to leave it to cure for a few days, then sand back with wet+dry, and hopefully do a second coat next weekend.
 

Attachments

  • P1010514.JPG
    P1010514.JPG
    94.8 KB · Views: 40
Last edited:

raleighnut

Legendary Member
Looks a nice green.
 
OP
OP
ChrisEyles

ChrisEyles

Guru
Looks pretty good from the pictures. My garage is never that empty.
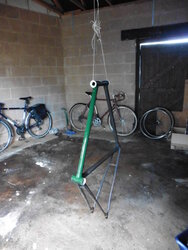
I'll post some close-up pictures after the second coat and rub down... but yes, I'm optimistic that it should come out looking OK.
We recently moved house, and the new one came with this enormous shed - empty/tidy at the moment, but the challenge is not filling it up with stuff* that won't fit when we have to move again!

* errr.... like old disabled bicycles....

Looks a nice green.

To me, a true racing green is definitely darker - this looks more like garden fence green to me! But maybe it will darken a little as it cures... or maybe it will grow on me ;)
 
OP
OP
ChrisEyles

ChrisEyles

Guru
While the enamel's curing between coats on the newer frame, I started work on the older one.

It was an absolute b*st*rd to take apart!

I think the cotter pins had fused into the crankset along with a load of rust - I had to get an extra long lever on the vice, and pop some wood between the vice and the frame/crank for cushioning, and they both gave an almighty CRACK when they finally loosend! Even after I got them out, the cranks were fused to the BB spindle. I had to turn them around and around with a bit of oil to loosen them up, which generated a *lot* of heat on the non drive side crank. I guess some of the rust/mangled cotter pin must have got ground in between the crank and the spindle... the drive side crank was also a swine to get off, and I found a pretty large metal shim inside it when I finally did, so I guess the hole for the BB spindle is not quite as round as it should be!

A lot of the rest of the nuts and bolts seemed equally fused together, with a depressing number of the nuts rouded off before I even started. A few of the smaller ones also gave up the ghost and sheared clean off (hopefully replacements can be scrounged from the other bike). Still, it wasn't all bad - the seat post came out very easily, which I definitely wasn't expecting, and the handlebars loosened up without too much of a fight. And I was a little more prepared for the fountain of bearings on disassembling the headset, so I managed to catch them all this time!

Here's where I am now with this one:

P1010584.JPG


The last thing to come off should be the bolt-on seat stays... but this is bolted on nice and tight, and is the worst offender for a rounded-off nut, so I'm really not sure how I can get this off!! It also seems like a pretty feeble bolt for an important structural link... don't want to do a half baked job and not be able to tighten it back up again properly. But, if anyone has any suggestions, fire away and I'll give them a go!

P1010586.JPG


Whatever happens now........ No more cotter pins to come out :biggrin: This makes me very happy indeed.
 
Last edited:
OP
OP
ChrisEyles

ChrisEyles

Guru
For rounded off nuts try a socket that's just a bit too small and hammer it onto the nut/bolt head, the shocks of the hammering also help the corrosion bond to break.

Great idea - I'll try this next time I do some more work on the bikes. Thanks!

Could you not add a tiny bit of black to get a darker shade?

The Rustoleum says not to mix colours (there are separate paints you can buy to mix colours, but I don't have this)... I will see if it darkens at all as it cures, and like I say, it may grow on me yet!

Here are the cranksets after a good clean (degrease/wash, then tinfoil and lemon juice to get the rust off the chrome). Pedals still need to come off and be disassembled, cleaned, bearings greased etc, but I am still recovering from the cotter pins at the moment, so thats a job for another day.

The gearing is comically high on the older bike - 75 gear inches (48t/18t, 28" wheel)! This is paired with some whopping great big cranks, which must give an interesting ride. The newer one is geared at aroudn 64 gear inches (44t/18t, 26" wheel), with more normal length cranks.

P1010587.JPG
P1010588.JPG

P1010589.JPG P1010590.JPG

The older one has quite a lot of missing chrome, which won't polish up no matter what I do. The newer one looks pretty good though.

Anyone any ideas how to tidy up chrome when it's gone this far? I was thinking of getting some silver paint and rubbing it in the rusted areas, wiping it off the smoother remaining chrome, but not sure how well that will work or how good it will look.

The other option would be to use the newer crankset on the older bike...... but I'm quite keen on keeping as much of the 1937 model going as possible, and reckon the comedy high gear and mahoosive cranks will all add to the character ;) Decisions, decisions...
 
Last edited:

AndyRM

XOXO
Hm, I hadn't considered that there would be an issue mixing the paint. Best to follow the manufacturer's guidance I suppose.

Personally I'd not do anything too abrasive to the chrome. It's very old and I wouldn't want to risk damaging it. I also think that trying to fill it in the marks with paint would look a bit naff. Patina is a good thing!

@biggs682 might be able to offer a more knowledgeable suggestion! @Tony Raynor knows his way around such things too.
 
Top Bottom