Bb386evo servicing

Page may contain affiliate links. Please see terms for details.

Mr. Cow

Über Member
Location
Manchester
Hey,

I have an annoying ''ticking" at the same rotation from the crank/bottom bracket area. I have checked bolt torques elsewhere and ruled out the easy stuff and it's still there. So I am fairly sure it's the BB (I had this ticking before I serviced the bike in which I also replaced the cadette, chain and front big chainring)

Problem is I have never took apart a BB and am a little unsure of what I need to do...

My bike is a wilier zero9 2015 with an bb386evo. My crankset is ultegras 6800 hollowtech.

Unfortunately I do not know what bb is in there nor have I been able to find out.

I can remove the cranks and chainrings. Do I then use something like a park tool bbt30 to then pop out the bearing and casing on each side?

Can I use a bb30/pf30 press fit tool to reinstall the bearings? Will such a tool be compatible with a bb386? Specificallt am looking at getting a BBB BTL-95 kit for this part, which says is suitable for use on BB30, PF30, BB86-92, BB90-95.

Is it recommended to not reuse bearings but buy new bearing/cups as I read that the removal process can damage them? Again this would be easier if I knew what sort of bearing was in there eg threaded/nylon cups etc.

Thanks for your help
 

iluvmybike

Über Member
You have to whack the bearings to get them out so yes fit new - they can be badly corroded in and often get destroyed in the removal. Don't know oif you can use the BB30 tools - I understand the BB386 is a bit bigger and uses a pressfit cup rather than the bearing just pressing into the frame
 
U

User6179

Guest
This is all the different BBs that fit in 386evo shell

DS9az.jpg
 
U

User6179

Guest
Hey,

I have an annoying ''ticking" at the same rotation from the crank/bottom bracket area. I have checked bolt torques elsewhere and ruled out the easy stuff and it's still there. So I am fairly sure it's the BB (I had this ticking before I serviced the bike in which I also replaced the cadette, chain and front big chainring)

Problem is I have never took apart a BB and am a little unsure of what I need to do...

My bike is a wilier zero9 2015 with an bb386evo. My crankset is ultegras 6800 hollowtech.

Unfortunately I do not know what bb is in there nor have I been able to find out.

I can remove the cranks and chainrings. Do I then use something like a park tool bbt30 to then pop out the bearing and casing on each side?

Can I use a bb30/pf30 press fit tool to reinstall the bearings? Will such a tool be compatible with a bb386? Specificallt am looking at getting a BBB BTL-95 kit for this part, which says is suitable for use on BB30, PF30, BB86-92, BB90-95.

Is it recommended to not reuse bearings but buy new bearing/cups as I read that the removal process can damage them? Again this would be easier if I knew what sort of bearing was in there eg threaded/nylon cups etc.

Thanks for your help


This is an educated guess but I think you might have a PF30 BB with these adapters (pic below) to run Shimano cranks.
This is just a guess as you can get a specific 386EVO BB for Shimano cranks so check you have the adapters before ordering anything.


FSA-Innenlageradapter-BB386EVO-30-to-24-Reducer-AL-black-universal-35735-108137-1481261279.jpg
 
U

User6179

Guest
This BB diversity issue is getting beyond a joke. Come back UN55 square taper, all is forgiven!

My new bike has the 386evo, the manufacturer told me it was fitted with a Shimano press-fit BB but when I got the bike it had a crank with a 30mm spindle on it( not Shimano press-fit)
What chance have you got if the bike makers don't know!
 
OP
OP
Mr. Cow

Mr. Cow

Über Member
Location
Manchester
Ok,

Just to update. I managed to get my BB out AFTER struggling with a rounded crank arm pinch bolt. Got round it luckily with a 6mm left handed hss drill bit (the 5mm snapped!). Fortunately I don't appear to have damaged the crank thread or recess. Despite having to drill quite deep, the thread is only in the adjacent hole.

It was indeed a pf30 with the 24mm reducers. One bearing side felt quite rough when i checked and there was evidence of a slight water ingress. I have got hold of a replacement cup and reducers and cleaned up the shell.

My question now is what grease/compounds should I use? I have seen some suggesting park pp1 grease for the centre bit, ap1 adhesive primer for the shell, and rc1 retaining compound for the cup faces. Does this sound right or can anyone suggest any alternatives? The frames is carbon but the BB shell I think is "bonded" in the frame and appears metallic. The BB cups are plastic.

Thanks (again!)
 

Cycleops

Legendary Member
Location
Accra, Ghana
Glad you got the old one out. Did you use a removal tool of any sort?
Have a look on YouTube there are quite a few installation videos on there.
 
OP
OP
Mr. Cow

Mr. Cow

Über Member
Location
Manchester
Glad you got the old one out. Did you use a removal tool of any sort?
Have a look on YouTube there are quite a few installation videos on there.

Yes, I used a BBB BTL-95 kit to remove and the same kit will be used to install. As I say it's just the grease/compounds I'm wondering about now. If it's any use the stuff that was already there was a white paste
 
Last edited:
OP
OP
Mr. Cow

Mr. Cow

Über Member
Location
Manchester
I've just realised the white paste that was on the old BB was only around the centre overlapping tube bit. The old BB seems to have been installed dry? Does this seem right.. it has done 12k and has only recently started creaking so...
 
U

User6179

Guest
I've just realised the white paste that was on the old BB was only around the centre overlapping tube bit. The old BB seems to have been installed dry? Does this seem right.. it has done 12k and has only recently started creaking so...

I have fitted 3 Shimano Press-fit BBs, I just clean any crap out the shell with GT85 and press in the cups, I used a little grease once and it made it harder to press the cups, I broke my home made press in the process.
 
OP
OP
Mr. Cow

Mr. Cow

Über Member
Location
Manchester
So, I finally got round to doing this. Thanks for all the advice and pointers on here. Otherwise I would never have been able to do it myself and would have resigned to taking it to the LBS.

I ended up changing the lot as a clean and grease of the bearings didn't sort it. I gave it a week before I was happy everything was sorted and there were no other issues as a result of me messing in the BB area. As with most things bike related half the battle is having the right tools, so if you fancy having a go replacing this BB for yourself (386 BB/shimano 6800 cranks), here's what you will need (and what you may need, depending...)


  • 5/6mm left handed HSS drill bits and reversible drill - needed to drill out worn/seized crank arm pinch bolts
  • Penetrating oil for the above if you need to drill them out
  • Allan key sets (more sizes the better, most stuff is generally 4/5/6mm)
  • Shimano FCM960 crank arm installation tool
  • Degreaser, to give your empty BB shell a good clean
  • BBB BTL-95 pressfit removal and installation kit
  • Park Tool AP-1 primer (brush around the shell)
  • Park Tool RC-1 retaining compound (apply to nylon cup faces where it interfaces with the BB shell)
  • (An alternative to the above p might be Loctite 7649 primer and Loctite 641 retaining compound, check suitability with your BB shell material)
  • FSA PF30 bottom bracket (part no. 200-3112 or BB-PF6000/CZ/Di2 (my bike isn't Di2 fitted, think this means it's just "compatible" with Di2 bikes equipped bikes)
  • FSA BB392EVO 24mm reducer (part no. EE084 - comes as pack of 2) - so you can fit 24mm ultegra cranks in there
  • Park Tool HPG-1 grease (grease grease grease! Used on bearing face, reducer, centre "tube" and the crank spindle.
  • Shimano Ultegra FC-6600 crank arm pinch bolts and washer - M6 x 19mm - Y1G398010 if you had to drill your old ones out
  • Shimano anti-seize assembly paste (use it on your screw threads when replacing crank arm pinch bolts
  • A torque wrench, for tightening bolts to the correct amount
  • Latex or similar gloves, quite cheap on ebay for 100pairs, this is a very greasy/messy job and saves you having to spend ages washing grease off your hands.

Most importantly, some chocolate or other snacks and many cups o' tea.

Some useful videos:

Removing crank arms:


View: https://www.youtube.com/watch?v=2bMyl0dcDW4


Removing PF BB:


View: https://www.youtube.com/watch?v=yOJAKBQOU9U


FSA video showing how to install PF30 BB and reducers (shown for 24mm FSA cranks but same applies for shimano hollowtech). Video shows both sides being pressed at the same time but I did one side at a time:


View: https://www.youtube.com/watch?v=YixcOGwn_hA


Take advantage whilst your cranks are out and give the frame around the BB area and the back of your chainrings good clean with degreaser/alcy wipes.

The original BB was a 3 pieces (2 outer cups and a centre piece). The new BB was 2 pieces with one side centre piece slotting "over" the other. This is the twitchy bum moment, as when your pressing you have no idea if its slotting in OK or just crushing the other side :ohmy:

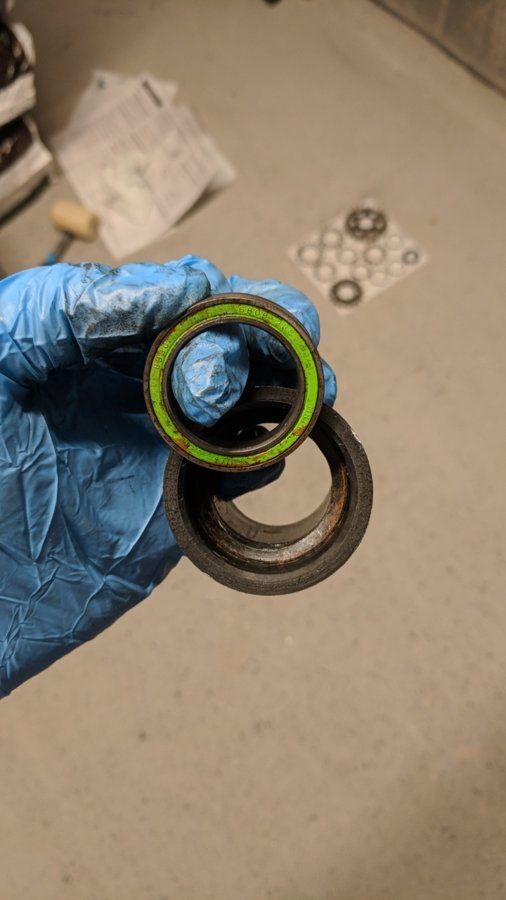
The old badly rusted none-drive side bearing:

Empty shell

Replacement BB
Had I not had to drill out the rounded crank arm pinch bolts :cursing: and had all the parts, I reckon it would only have taken about half a day of careful working.

Hope this is useful to someone who may be googling in future.
 
Last edited:

Cycleops

Legendary Member
Location
Accra, Ghana
So, I finally got round to doing this. Thanks for all the advice and pointers on here. Otherwise I would never have been able to do it myself and would have resigned to taking it to the LBS.

I ended up changing the lot as a clean and grease of the bearings didn't sort it. I gave it a week before I was happy everything was sorted and there were no other issues as a result of me messing in the BB area. As with most things bike related half the battle is having the right tools, so if you fancy having a go replacing this BB for yourself (386 BB/shimano 6800 cranks), here's what you will need (and what you may need, depending...)


  • 5/6mm left handed HSS drill bits and reversible drill - needed to drill out worn/seized crank arm pinch bolts
  • Penetrating oil for the above if you need to drill them out
  • Allan key sets (more sizes the better, most stuff is generally 4/5/6mm)
  • Shimano FCM960 crank arm installation tool
  • Degreaser, to give your empty BB shell a good clean
  • BBB BTL-95 pressfit removal and installation kit
  • Park Tool AP-1 primer (brush around the shell)
  • Park Tool RC-1 retaining compound (apply to nylon cup faces where it interfaces with the BB shell)
  • (An alternative to the above p might be Loctite 7649 primer and Loctite 641 retaining compound, check suitability with your BB shell material)
  • FSA PF30 bottom bracket (part no. 200-3112 or BB-PF6000/CZ/Di2 (my bike isn't Di2 fitted, think this means it's just "compatible" with Di2 bikes equipped bikes)
  • FSA BB392EVO 24mm reducer (part no. EE084 - comes as pack of 2) - so you can fit 24mm ultegra cranks in there
  • Park Tool HPG-1 grease (grease grease grease! Used on bearing face, reducer, centre "tube" and the crank spindle.
  • Shimano Ultegra FC-6600 crank arm pinch bolts and washer - M6 x 19mm - Y1G398010 if you had to drill your old ones out
  • Shimano anti-seize assembly paste (use it on your screw threads when replacing crank arm pinch bolts
  • A torque wrench, for tightening bolts to the correct amount
  • Latex or similar gloves, quite cheap on ebay for 100pairs, this is a very greasy/messy job and saves you having to spend ages washing grease off your hands.

Most importantly, some chocolate or other snacks and many cups o' tea.

Some useful videos:

Removing crank arms:


View: https://www.youtube.com/watch?v=2bMyl0dcDW4


Removing PF BB:


View: https://www.youtube.com/watch?v=yOJAKBQOU9U


FSA video showing how to install PF30 BB and reducers (shown for 24mm FSA cranks but same applies for shimano hollowtech). Video shows both sides being pressed at the same time but I did one side at a time:


View: https://www.youtube.com/watch?v=YixcOGwn_hA


Take advantage whilst your cranks are out and give the frame around the BB area and the back of your chainrings good clean with degreaser/alcy wipes.

The original BB was a 3 pieces (2 outer cups and a centre piece). The new BB was 2 pieces with one side centre piece slotting "over" the other. This is the twitchy bum moment, as when your pressing you have no idea if its slotting in OK or just crushing the other side :ohmy:

The old badly rusted none-drive side bearing:

No shell

Replacement BB
Had I not had to drill out the rounded crank arm pinch bolts :cursing: and had all the parts, I reckon it would only have taken about half a day of careful working.

Hope this is useful to someone who may be googling in future.


You missed out 'A lot of patience'.:smile:
 
Top Bottom