Coventry Eagle Triple Ace Convertable Tandem.

Page may contain affiliate links. Please see terms for details.
OP
OP
Illaveago

Illaveago

Guru
Has it been pulled back in an attempt to get the two parts to line up?
I think it has crashed into something head first at sometime way off in the past. The amount of rust shows that it was some time ago. The crossbar has stress lines in the remaining paint in a similar position showing that it must have been a bit of an impact. I am trying to figure out why there is a crease in the dent.
A job for my hydraulic ram.
 

classic33

Leg End Member
Head tube impact tends to crease the down tube. Compressing the lower tube, stretching the upper.
 
D

Deleted member 1258

Guest
I first thought that the bike might have dropped onto something, but I'm wondering if the tube has been creased on impact and has then sprung back again.

I would have expected damage to the bottom tube not the top in a front end impact. I also remember being surprised at how big a dent a small spanner made in a 531 top tube when it slipped whilst I was trying to free something that had seized up.
 
OP
OP
Illaveago

Illaveago

Guru
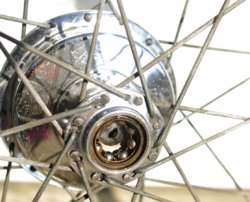
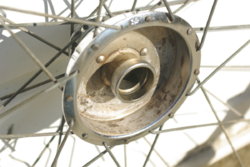
A bit of an update ! I have been busy removing some parts and have tried to tackle the rust on the chrome. Some parts have cleaned up quite well whilst others are quite badly pitted and peeling.
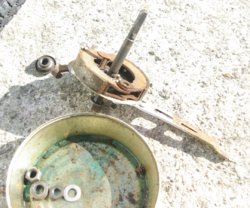
What I have discovered is that it is handy having a tandem that breaks down into smaller bits as it is a bit like working on two bikes at the same time. I tried to limit my work to one section at a time. The cotter pins on the cranks were seized in and required a bit of heat from a blow torch before they would move. Once off I could brush on some rust removing gel to clean up the pedals, crank and chain rings.
In my research I discovered a catalogue from 1955/6 on the Veteran-Cycle Club web site. It shows a picture of how the tandem looked in both tandem and single cycle mode, stating that it could be ridden as a single in the week and as a tandem at the weekends. The catalogue also makes a point of featuring the new style chromed head badge. The standard colour was flamboyant magenta and the price was £37 19s 6d. For an extra £1 0s 0d you could choose an alternative colour option from their list. In my effort to try to establish when the Convertible first appeared I looked at a 1948 catalogue in which they offered a tandem but it was a normal one in either two crossbar or lady back versions and the colour was black, there was no mention of a Convertible.
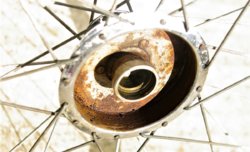
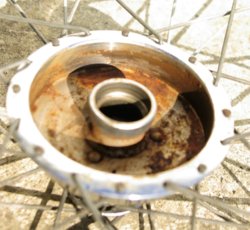
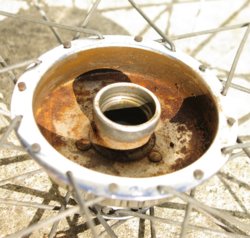
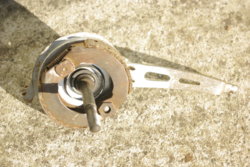
After cleaning up the front section chromed parts I set about removing the rear cranks. These were just as seized as the fronts. I wanted to remove these cranks as the frame had been damaged when somebody fitted a prop stand and crushed the tubes. Once removed I could gain access to the damage although space is a bit limited and there are some awkward dents. I will think about what to do next.
PICT0425.JPG
PICT0433.JPG
IMGP9544.JPG
IMGP9543.JPG
IMGP9550.JPG
 
OP
OP
Illaveago

Illaveago

Guru
A bit of an update of what I have been doing. I removed the bottom bracket as it was very notchy. The axle shaft is a Bayliss Wiley No. 8 and is a bit pitted on one bearing face. I will just clean it up as best I can and re pack it with fresh grease. We don't intend on using the tandem for long distances so I think it should be okay.
Today I have been trying to repair one of the front mudguards which is broken. It is a Phoenix Favourite and made of celluloid. As celluloid is difficult to glue I have tried to think of a way to repair them. I thought I would try to use some 1mm plastic card to reinforce the repair and use some double sided tape to fix it to the underside of the mudguard.
I started off today by cleaning the mudguard thoroughly. I then carefully heated up the damaged areas with a heat gun. I was very wary of heating it up too much as I can remember heating a ping pong ball up once and had it burst into flames. Once the plastic was pliable I tried to work it back into shape as best I could. I made a template out of paper and cut some plastic to shape. I lined up the bits of the mudguard as best I could and then fixed some double sided tape underneath to hold it together. I then removed the backing to the tape and fixed the plastic card into position. I trimmed up the edges using a pair of scissors. I think the double sided tape should hold as it is used to hold mouldings and badges onto car bodywork.
PICT0438.JPG
PICT0439.JPG
PICT0440.JPG

The mudguard is now in one piece but will require a bit more work to finish it off. It will need a bit more heating to iron out some of the creases and I will have to find a way of filling some gaps.
 

Ian H

Ancient randonneur
The Tandem Club used to supply threaded sleeves to convert old bottom-bracket shells to modern dimensions. As I recall, they were made by George Longstaff, so may not still be available. The other way, less convenient, is to braze in a sleeve and tap a thread.
 
OP
OP
Illaveago

Illaveago

Guru
As the weather has been nice I thought I had better take advantage of it and do a bit of work on the tandem.
I thought I had better check the brakes and bearings . It turned out that it was a good job I had as the drum was very rusty and needed a good clean . It looks as though water had got in and settled at the bottom with the brake shoe acting as a sponge keeping that area damp.
I brushed rust removing gel into the drum and let it soak a while . It needed 2 treatments plus a bit of scraping with a screwdriver.
Once I washed out the residue and dried it out it was a lot cleaner but there was some deep pitting where the rust had attacked it.
I cleaned up the brake shoes, greased the bearings and brake operating cam and reassembled the hub. I wonder what the rear one will be like.
 

Attachments

  • IMGP9832.JPG
    IMGP9832.JPG
    259.5 KB · Views: 21
  • IMGP9833.JPG
    IMGP9833.JPG
    208.6 KB · Views: 23
  • IMGP9835.JPG
    IMGP9835.JPG
    138.7 KB · Views: 27
  • IMGP9836.JPG
    IMGP9836.JPG
    135.3 KB · Views: 25
  • IMGP9837.JPG
    IMGP9837.JPG
    161.1 KB · Views: 24
  • IMGP9838.JPG
    IMGP9838.JPG
    157.9 KB · Views: 22
  • IMGP9840.JPG
    IMGP9840.JPG
    111.4 KB · Views: 24
  • IMGP9841.JPG
    IMGP9841.JPG
    218.5 KB · Views: 22
OP
OP
Illaveago

Illaveago

Guru
A bit of an update .
Some of you may have been wondering what had happened to my tandem . Not a lot ! I had been trying to figure out a way to straighten the front frame .
The impact of the head on collision had bent both the crossbar and downtube . I discovered that the strange crease in the downtube had been caused by the shoulder of the front forks impacting the downtube at right angles. In other words , as the front wheel hit something hard the wheel was flipped round at right angles but the frame continued in a forward direction bending just behind the front lugs . This is when the fork shoulder went into the downtube .
This morning I decided that I would have another look at the frame . One of the main reasons why I needed to straighten the frame was that since taking the bike apart the frame wouldn't fit back together . The frame had sprung apart and the mortice and tenon type joint wouldn't line up .
It was a bit of a Heath Robinson set up with a large piece of Dexion bolted between the crossbar and downtube fixing points and a hydraulic wedge acting between blocks of wood placed between the forks and the Dexion . It took some force ! It isn't perfect and there is still a small crease left in the downtube . The bend in both tubes has been reduced and the frames now line up and I was able to assemble the bike in single and tandem configuration .
I will post some pictures later .
 
Top Bottom