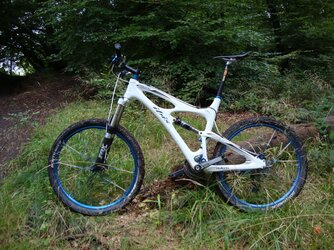
Dream frame just landed.......

Page may contain affiliate links. Please see terms for details.
OP
OP
Cubist

Cubist

Still wavin'
Location
Ovver 'thill
Helitape is something I had not considered for my bike. I did a search and found recommendations to use 3M as well as a couple of others. Looks like something I will be ordering before I start thrashing my bike. Glad I saw you mention it.

In the opening post I did not understand exactly what the phrase "cut the paint" means.

I like this thread, nice stuff for an MTB newbie to see. Thanks for taking the time to do it. :thumbsup:
Helitape is a must to stop any bike looking scruffy especially around cable rub points. The paint was polished with t cut to remove surface scratches from the lacquer. If ir helps I'll do a step by step guide to how to make it smooth and lift free.
 
OP
OP
Cubist

Cubist

Still wavin'
Location
Ovver 'thill
Very interesting. I'm now wondering whether I should get Helitape for my FF29, I'd previously dismissed the thought.

Surprised the Carbon frame is heavier as well.
it's just short of 3kg with shock. There are lighter carbon frames but this should build up to about 30lb. As an enduro frame the emphasis is on descending fast, with climbing ability considered as a break between descents. It's no XC whippet, that's for sure, but at this sort of weight it weighs the same as an entry level hardtail.
 

RWright

Guru
Location
North Carolina
Helitape is a must to stop any bike looking scruffy especially around cable rub points. The paint was polished with t cut to remove surface scratches from the lacquer. If ir helps I'll do a step by step guide to how to make it smooth and lift free.
I wasn't sure but thought you may have been talking about polish or rubbing compound. My bike being flat black I don't think I will do that to it. I will probably just give it a quick polish. I am going to buy some helitape for the chain stay and cable contact points for all my bikes. My road bikes already have it. The mountain bike's chain stay protector looks pretty fresh, only a few nicks in it. My road bikes could use replacing, getting a little old looking on both of them. I guess I will maybe do the down tube on the MTB, at least part of it. Looking at all this brought a chain tensioner to mind. I will start reading and see what I can find out about those and if I think I need one. It never ends, always something else I want for my bikes. :wacko:
 
OP
OP
Cubist

Cubist

Still wavin'
Location
Ovver 'thill
I wasn't sure but thought you may have been talking about polish or rubbing compound. My bike being flat black I don't think I will do that to it. I will probably just give it a quick polish. I am going to buy some helitape for the chain stay and cable contact points for all my bikes. My road bikes already have it. The mountain bike's chain stay protector looks pretty fresh, only a few nicks in it. My road bikes could use replacing, getting a little old looking on both of them. I guess I will maybe do the down tube on the MTB, at least part of it. Looking at all this brought a chain tensioner to mind. I will start reading and see what I can find out about those and if I think I need one. It never ends, always something else I want for my bikes. :wacko:
Chain tensioners are a boon if you tend to run clattering descents, as they stop the chain smacking the chainstay, and keep it on the chainrings. They are a real must on a single front ring, where you don't have the benefit of a mech to stop the chain unshipping.

The one on the Mojo is Mojo specific and made by MRP. They cost a whopping £120 apparently. I'm therefore glad it was thrown in with the frame. If you run a double up front you'll benefit from a chain tensioner, which is mounted either on the bottom bracket or on ISCG tabs around the bracket. Blackspire do a particularly simple and popular one called the Stinger.

With current compact doubl;e chainsets for MTB like the XT 785, and don't need a tensioner but do need a bit of bash protection MRP do a BB mounted bashguard which again mounts on the BB shell. I have one on the Canyon, which a year or two ago could only be sourced in the USA, but cost a far more reasonable £32.00!
 

02GF74

Über Member
welcome to the Mojo club. the frame gives a wonderful ride removing lumpiness from the ground and is surprsingly light.

here is mine. (11.01 kg)
 

Attachments

  • DSC08780.JPG
    DSC08780.JPG
    237.9 KB · Views: 77
OP
OP
Cubist

Cubist

Still wavin'
Location
Ovver 'thill
Still no helitape by the way.... this is getting frustrating. I have enough left over from the last job to do the cable rub points, so I'm going to do that impatient thing and crack on.
 
OP
OP
Cubist

Cubist

Still wavin'
Location
Ovver 'thill
Helitape is great stuff, but you need to get it right. It turns out all I have left is a few square inches, but it's enough to start. I'll do the larger contact areas when it arrives in next week.
You have to do it indoors away from draughts to stop grit getting under the tape. It's stretchy and compliant when it's warm, so use a hairdryer to warm the frame and the tape as you smooth it on. I always use Isopropyl alcohol (IPA) to completely degrease the paint before applying it. You get this stuff in pump bottles off eBay. Check that it's 99%..... any less and it'll leave an oily residue.
002.jpg
001.jpg 004.jpg
009.jpg
Always cut helitape with a sharp pair of scissors or a fresh Stanley blade, and leave rounded edges so that it's less likely to lift at the corners where dirt can get under it. Cut to suit where the cables contact the paintwork, especially head tubes.
011.jpg
012.jpg

So, first it'll need a seatpost fitting to clamp in the stand. The Reverb has been fitted using Carbon assembly paste, and only torqued up enough to stop it slipping.
014.jpg
In the stand ready to build up
016.jpg
 
OP
OP
Cubist

Cubist

Still wavin'
Location
Ovver 'thill
I'll fit the fork first, as I need the bars on to add brakes. This stainless steel Acros headset is of unknown history. It feels smooth, but we can check teh grease and the bearings if we carefully lift the seal from the upper race using a seal pick.
018.jpg
Looks like there was some good, clean grease in there already. I'lll add a touch more so we know it's properly packed.
019.jpg
020.jpg

A decent layer of grease around the crown race will mean a decent seal and prevent ingress of shite. This is a tapered steerer by the way.
021.jpg
You can wipe the excess once you've pushed the steerer up into the headset.
022.jpg
Slide the compression ring down onto the upper head race and it snugs the steerer against the bearing race.
023.jpg
Spacers on. (I've left off teh top seal cover , this is just to get everything measured up. These are two 10mm spacers. The total stack will be two x10mm, a 40mm stem, a 5mm spacer then topcap.
025.jpg
027.jpg

Steerer and bars on
030.jpg
Coppaslip on the topcap bolt
031.jpg

Then tightened enough to just eliminate play in the headset.
032.jpg
Which you can check by wiggling the fork crown.
033.jpg
Then tighten the steerer clamp bolts, alternating, evenly and with just enough torque to stop the bars turning unless they take a big whack. You want them to break free in a crash to save the steerer and head from damage.
034.jpg

SO, that's the fork on. I've got to go to work now, but I'll put some more on later!
 
OP
OP
Cubist

Cubist

Still wavin'
Location
Ovver 'thill
Brakes next. These are Shimano XT M785, powerful brakes which I set up to run "one-fingered". This one needs a bit of a clean and teh pads resetting before i FIT IT.
035.jpg

Cleaned with IPA and using a screwdriver blade to prise the pads apart, pushing the pistons back into the caliper. You can do this gently to stop damaging the pad surface, although I will probably fit kevlar pads to this when I've done.
037.jpg

Clamp on the bar and nipped up roughly where it will sit so I can measure the hose properly. This hose is about 150cm long, and I'm hoping it will fit this frame. If not I have a contingency plan of a brand new set of SLX I'll swap with Cubester.
039.jpg
Natty little carbon hose clamp under the downtube
040.jpg
Through the hose guide/clamp
041.jpg
and down into the polycarbonate hose cover/guard
043.jpg
Out of teh guard and up past the hose clamp base which I'll clip on with hose clips
046.jpg
Another hose clip attaches it to the top of the swingarm (can't really call this a seatstay!)
047.jpg
and bolted onto the Post Mount lugs. The rotor is 180mm so I've used two 10mm spacers to ensure the caliper fits. I needed to fine tune the fit with washers/shims.
049.jpg
Routing past teh BB with enough slack to deal with the swingarm movement up and down
052.jpg
 
OP
OP
Cubist

Cubist

Still wavin'
Location
Ovver 'thill
Front brake next. Much simpler this
055.jpg
Bolts into PM lugs on fork leg. Again, will need fine-tuning with shims. This fork has a fixed rotor size of 203mm. Big rotor, but it saves on adapters
056.jpg
Hose guide on the fork crown
057.jpg
There, that's fitted and working now
058.jpg
 
OP
OP
Cubist

Cubist

Still wavin'
Location
Ovver 'thill
Bottom bracket and cranks next.
This Hope Stainless Steel BB has just been treated to some new grease in the bearings, and the grey seal replaced. The black outer plastic shield next to it clips on and forms a seal to keep shite off teh bearings.
060.jpg
The BB shell on the bike is 68mm. This is the driveside BB cup, and we've got a BB mounted bashguard/chaindevice fitted which takes up 2.5mm so we only need one 2.5mm spacer to add to it drive side.
061.jpg
Clean and greased threads means the BB cup spins on by hand nearly all the way. Left hand thread on the drive side remember!
062.jpg
BB Socket tool with 1/2 inch drive is an absolute boon for this job. Snugs on and less likely to damage the cups . 1/2 inch drive means it's robust when you want to remove a stubborn one as well!
063.jpg
064.jpg
065.jpg

Non drive side, and the plastic connecting tube, with greased O rings for a good seal. This screws on conventional right hand thread.
066.jpg
and a 2.5mm spacer to complete the width
067.jpg
That's teh BB fitted
068.jpg
 
OP
OP
Cubist

Cubist

Still wavin'
Location
Ovver 'thill
Cranks on now. This is a Shimano XT M785 compact double. It has 38T outer ring and was originally fitted with a 26t inner, but I swapped it to 24 'cos of the hills round here. The front mech is a direct mount SRAM XO by the way, double specific and single bolt fitting on a frame mounted lug. The now cleaned crank can be pushed through from the drive side
070.jpg

and driven home all the way through with the heel of your hand.
071.jpg

Add the NDS crank arm onto the splined hollowtech axle
072.jpg

and use the finger tool to nip up the preload cap just enough to eliminate play in the crank arm. You can rock teh crank arm to feel for play, and as soon as you've dialled it out tighten the crank arm pinch bolts.
073.jpg
 
OP
OP
Cubist

Cubist

Still wavin'
Location
Ovver 'thill
Now for the gears. This is a Shimano XT M780 shadow. It's had a bit of use on the Canyon, so has some paint scrapes. Coppaslip on the hanger bolt
074.jpg
and bolted into the hanger.
075.jpg

Next we need to thread the chain through. I've checked that it fits by letting the air out of the rear shock and compressing the swingarm so the chain is at its longest. It fits with no overlap, so I'll order another chain in case this one proves to be too short. (not that it should, I tend to run doubles at this length)
001-1.jpg

over the chain guide
002-1.jpg
through the rear mech and round the cassette. Not in this picture I've used a cable tie to lash the mech cage to the chainstay. This takes all the tension out of the chain and means I can work without fear of everythigg springing back
004-1.jpg
006-1.jpg
008-1.jpg

Gold KMC Missing link joins the chain.
009-1.jpg
and now I can remove the cable tie
010-1.jpg
 
Top Bottom