Another Brompton Project

Page may contain affiliate links. Please see terms for details.

jiberjaber

Veteran
Location
Essex
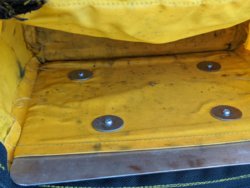
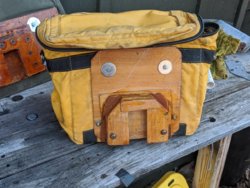
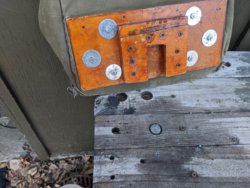
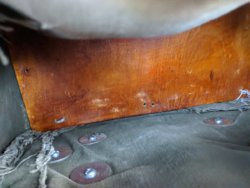
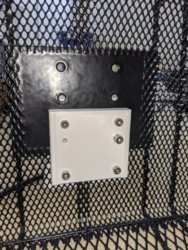
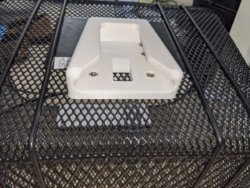
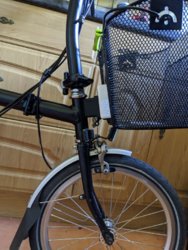
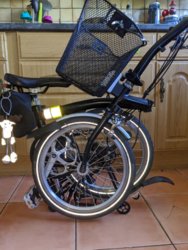
I'm impressed by the home engineering being done in this thread.

And I can see why you would want to do it, given the ludicrous price of some Brommie bags.

However, their 'basket bag' is among the cheapest in the range at £65.

https://www.brompton.com/brompton-gbr/uk-store/bags/borough-basket-bag-in-dark-grey/c-24/c-72/p-8673

Yeah - I don't think this is a commercial offering here but significantly cheaper than the £65 but with some hassle. It's about the same size as that bag but without proper fixings and reflective bit plus there is the handy additional webbing on the official basket bag but I am sure we could knock something similar up using cable ties to the mesh basket :laugh::laugh:

If the bracket works I might offer them up for sale - though they do take a long time to print (7 hours for just the main part when it is ready for the final print)
 
OP
OP
Gunk

Gunk

Guru
Location
Oxford
Finally the seat height insert arrived today, very clever little widget which all new Bromptons are supplied with, these allow the seatpost to stop at the same position each time you lift it rather than having to guess then stop en-route to adjust it.

509547


I adjusted the post and marked with masking tape, I also marked the position of the seat.

509549


509548


I cut the sleeve down, pulled out the stem, inserted the sleeve and job done!
 
OP
OP
Gunk

Gunk

Guru
Location
Oxford
I’ve also sorted out the lighting today, I’ve already got a USB front light mounted to the handlebars and another which will attach to the basket.

So today I’ve ordered the front reflector.

509551


Bracket for the rear reflector/light

509553


And the neat Brompton Spanninga AAA battery combined LED light/reflector.

509554
 

jiberjaber

Veteran
Location
Essex
So back plate and bracket printed last prototype though I am still considering which orientation to print it in. This one was laying flat and as I expected there was some weakness along the layers (fixed with some CA glue).

Tried 4l of milk in it and it didn't fall apart - but the true test will be up and down a couple of curbs with that in the front :smile:

1584835627058.png
 

12boy

Guru
Location
Casper WY USA
Here's a couple of fugly buggers I made 7 or 8 years ago as smaller options than the huge shopping bag which is not aerodynamic. Probably a lot stouter and heavier than need but I had a bunch of wood glue, shellac and 1/8 inch plywood to play with. They don't hop off with bumps even though there is no latch.
 

Attachments

  • IMG_20200321_182347.jpg
    IMG_20200321_182347.jpg
    199.5 KB · Views: 12
  • IMG_20200321_182332.jpg
    IMG_20200321_182332.jpg
    240.6 KB · Views: 14
  • IMG_20200321_182315.jpg
    IMG_20200321_182315.jpg
    222.7 KB · Views: 15
  • IMG_20200321_182301.jpg
    IMG_20200321_182301.jpg
    245.4 KB · Views: 11
  • IMG_20200321_182252.jpg
    IMG_20200321_182252.jpg
    139.5 KB · Views: 11
OP
OP
Gunk

Gunk

Guru
Location
Oxford
So back plate and bracket printed last prototype though I am still considering which orientation to print it in. This one was laying flat and as I expected there was some weakness along the layers (fixed with some CA glue).

Tried 4l of milk in it and it didn't fall apart - but the true test will be up and down a couple of curbs with that in the front :smile:

View attachment 509631

That looks good, could you show some more photos of the back plate and how it’s all screwed together?
 

jiberjaber

Veteran
Location
Essex
That looks good, could you show some more photos of the back plate and how it’s all screwed together?

At the moment there are 6 mounting holes, 2 line up with the bottom 4 of the metal mounting plate, the lower 2 go through the mesh itself
I've used M4 fixings as I had them to hand and they happen to fit through the mesh (tight fit though). I'm not sure the middle of the 6 fixings are required at the moment but they are there. I've only got 3 M4x16mm screws left so had to improvise with a few nuts to get the right length on the middle test bolt!
I've since added to the design, there is now a 1.5mm offset in the face that meets the basket to allow a straighter fit and avoid bending the bracket.
1584876856359.png


I've also added 2 re enforcing channels for a 2mm rod to be inserted but I've not printed that feature yet.
1584876944141.png

Currently printing an ABS version vertically orientated, 10h30m till its finished!
 

Attachments

  • IMG_20200322_112658.jpg
    IMG_20200322_112658.jpg
    165.8 KB · Views: 5
  • IMG_20200322_112715.jpg
    IMG_20200322_112715.jpg
    228.4 KB · Views: 5
Last edited:
OP
OP
Gunk

Gunk

Guru
Location
Oxford
Is the basket not a bit too low on the bike, when I trial fitted I thought I needed the bracket much lower that that.
 

jiberjaber

Veteran
Location
Essex
Correct! Well spotted, using the bottom most holes works better!
 

Attachments

  • IMG_20200322_120743.jpg
    IMG_20200322_120743.jpg
    148.2 KB · Views: 10
  • IMG_20200322_120155.jpg
    IMG_20200322_120155.jpg
    138.8 KB · Views: 10

rualexander

Legendary Member
Brompton might be a bit miffed if they found out you are using their logo?
Not that they are very likely to see it of course.
 
Top Bottom