jiberjaber
Veteran
- Location
- Essex

 )
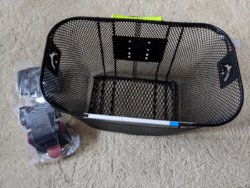
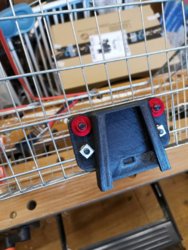
)So printed off a draft bracket to use to size the actual one. There's a couple of issues.....
In order to use the basket in shopping trolly mode it needs to line up about the bottom 2 holes on the basket in order to clear the 'top tube' when folded in to that config. It fouls the seat but this is easily remedied by rotating the seat.
The complication comes from the mounting holes are the same place as the bracket sides, so some cunning engineering solution required in teh design to mount it using the existing holes... or just drill some new holes (less inclined to do that as there's nice plastic coating on the cage
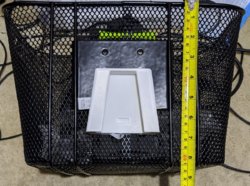
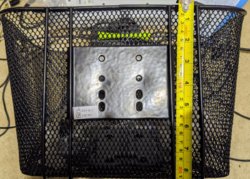
Another option would be a metal adaptor plate to offset teh basket up a bit more and allow side flange on the printed part to connect to the metal plate... There is a similar design already on thingiverse
Some thinking required on the ride to the pub and back tonight I think... I've done recessed nuts before but not taking the load this might take (though max weight for on the label is 5kg!)
If using the current holes, they need to be aligned with the top half of the block- I guess my concern is around additional leverage on the 3d printed part. The part will have to be printed with the layers vertical rather than horizontal, that much seems logical so far (which was how the test piece was printed.)My plan was just to drill it and then use some oversized washers on the mesh part of the basket. Are you saying that the basket is too close to the frame, will it need spacers?
Cable ties ?Your solution is very elegant, mine will involve holes, washers, spacers and general home bodgery 😂
If it’s any use to you, I can print one / all of those things for you and post.Your solution is very elegant, mine will involve holes, washers, spacers and general home bodgery 😂
A bit like my "proof of concept" bodgery?Your solution is very elegant, mine will involve holes, washers, spacers and general home bodgery 😂
If it’s any use to you, I can print one / all of those things for you and post.
Which one(s) do you want?You’re a star that would be really helpful
Which one(s) do you want?