Making Models From Scratch

Page may contain affiliate links. Please see terms for details.
OP
OP
Reynard

Reynard

Guru
Sounds like both would work. Neither are expensive, so might buy a tube of each and see what works best in terms of shaping, sanding and priming. (I see a head-to-head test coming on here...)

I'll probably want to use something for smoothing off the edges of the chassis as well, as I made a few mistakes on the upper rails, and sanding will only get me so far... :blush:
 

MrGrumpy

Huge Member
Location
Fly Fifer
579797

579798

579798

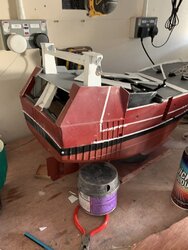
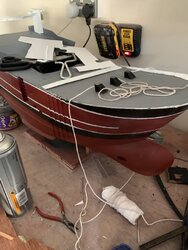
Sons trawler is coming on. It floats the RC works , it’s even got a huge net out the back !
 
OP
OP
Reynard

Reynard

Guru
Hmm, well one step forward, two steps sideways...

Went into town this afternoon, and the DIY and car care shelves in Wilkinsons are pretty bare, so there wasn't much choice when it came to filler. I didn't see the point of buying a massive tub. So ended up with a small tube of Ronseal white wood filler, which hopefully should do the job, given the laminated card acts a lot like wood anyway.

The other sideways step is the paint. I've now got a primer that coats everything well and stays put on the parts. But now, the paint I have (professional quality artists acrylics) doesn't want to stick to the wretched primer. Aaaargh! Was trying to paint up the components for the shock absorbers prior to assembly, but the paint just flakes off. And I gave everything two coats as well... :cry:

Looks like I may well have to bite the bullet and get a small selection of modelling enamels.

The step forward has been solving the slight issue with the prop shaft. I'd used a section of wooden knitting needle, but when I checked the rear axle assembly with the prop in situ, the axle wasn't sitting totally perpendicular to the chassis - which will cause problems when fitting the suspension linkages. Didn't fancy faffing around with a file etc and risk breaking things, so changed tack completely and made a new shaft out of rolled paper with a wire core. That's got just enough give in it to sort the alignment issues.
 
Last edited:
Hmm, well one step forward, two steps sideways...

Went into town this afternoon, and the DIY and car care shelves in Wilkinsons are pretty bare, so there wasn't much choice when it came to filler. I didn't see the point of buying a massive tub. So ended up with a small tube of Ronseal white wood filler, which hopefully should do the job, given the laminated card acts a lot like wood anyway.

The other sideways step is the paint. I've now got a primer that coats everything well and stays put on the parts. But now, the paint I have (professional quality artists acrylics) doesn't want to stick to the wretched primer. Aaaargh! Was trying to paint up the components for the shock absorbers prior to assembly, but the paint just flakes off. And I gave everything two coats as well... :cry:

Looks like I may well have to bite the bullet and get a small selection of modelling enamels.

The step forward has been solving the slight issue with the prop shaft. I'd used a section of wooden knitting needle, but when I checked the rear axle assembly with the prop in situ, the axle wasn't sitting totally perpendicular to the chassis - which will cause problems when fitting the suspension linkages. Didn't fancy faffing around with a file etc and risk breaking things, so changed tack completely and made a new shaft out of rolled paper with a wire core. That's got just enough give in it to sort the alignment issues.

I've been experimenting with some car filler this very day on an unusual project that may be featured here if it works. The stuff pongs bigly.

What primer are you using? I use cheapo rattle cans for car spraying off'f the Bay of E. My acrylics come from Lucas and Amsterdam and never had a problem.

Maybe try Revell of Vallejo acrylics?

As an aside, I've realised that some of your methods for making springs will work in a smaller scale if I use fine wire which will come in very handy for a future project...
 
Last edited:
OP
OP
Reynard

Reynard

Guru
I've been experimenting with some car filler this very day on an unusual project that may be featured here if it works. The stuff pongs bigly.

What primer are you using? I use cheapo rattle cans for car spraying off'f ebay. My acrylics come from Lucas and Amsterdam and never had a problem.

Maybe try Revell of Vallejo acrylics?

As an aside, I've realised that some of your methods for making springs will work in a smaller scale if I use fine wire which will come in very handy for s future project...

Heh, tell me about car filler pong. I've done my share of automotive repairs over the years...

I'm using the Tamiya fine surface primer for plastic & metal - bought it because the acrylic wouldn't stick to the plastic and metal parts I made, or the ones that have been completely coated in glue. My acrylics are a mixture of Daler Rowney System 3 and Windsor & Newton Finity, and have been using them neat rather than diluted down with water.

In three weeks, the shop in town selling modelling supplies will re-open, so I can get some paint / advice.

Been looking at some paints online, and why, oh why won't they give the pigments their proper names, like cadmium red or cerulean or payne's grey or yellow ochre and stuff... At least with those names, I know what shade the stuff is...
 
OP
OP
Reynard

Reynard

Guru
Because of the paint issue, I can't really do much on the car below the main rails, so I've turned my attention to the stuff "up top" so that I'm not twiddling my thumbs.

The next stage there is the roll cage. It looks straightforward, but isn't, as there are sections of it that aren't all in the same plane and / or have some fairly complex shapes. Made a jig out of a piece of old floorboard, with the cage footprint marked out, and holes to take the wire pegs, so that I can work separately to the chassis, and then, eventually, simply drop the completed driver's cab onto the rails.

Started out by making a set of drawings (more about that later) and then got stuck into the two pieces that are totally perpendicular to the chassis rails. The bit at the front of the cage is fairly simple i.e. rectangular, hole in the middle and with fillets in the corners, so I just drew as many layers as I needed on a piece of card, cut them out and stuck them together, laminating in the two locator pegs on the bottom as I went along. The other section is much more complicated - a sort of hexagon with sections cut out of it, so I made that using the drawing as a template and then pricking through that onto the card below with mum's lace making awl. This section got modified during the making to take the slope of the roof rails into account, so the sections got progressively shorter with each layer. Plus the usual wire pins got laminated in.

I've been using 2-part epoxy rather than superglue (except for the wire pegs - epoxy doesn't hold them in place well enough) to avoid the allergy issues. Epoxy is definitely messier than superglue, and takes longer to dry. And then there's that fine line between mixing enough glue to do what you need to do, but it not starting to set on you...

Needed to make some of the sections that slope in two different directions, so the layers for those were cut to size for one of the angles, laminated with paper glue (pritt stick) and then, using the drawing as a guide, I could create the other angle by pushing the layers into position before the glue dried. The ends were secured with a dab of superglue, then later, when dry, the glue needed to soak the edges was applied outside.

The roof rails were made that way, as were the two pieces at the front of the cab, and some of the bits that surround what would be the fuel tank in real life. Some of these pieces were stuck to the relevant internal bulkheads etc - it improves the structural integrity of the sections, plus it means I don't have the nightmare of small parts floating around where they might be lost.

All that's left to make are two small pieces that take the rear wing and the side sections of the cab - the latter's going to be fun (NOT!) as it's curved.

I haven't glued the roll cage yet - everything's held together by blu-tac - because I need to tidy up all the parts first, then make the cab fixtures and fittings i.e. seat, dash, steering wheel first. Really don't want to be in the situation where I can't get them into the completed cage...

Also, just as well I hadn't glued the cage together, as I had a bit of a brain fart when doing the drawings, and hence, that mistake got carried through to the jig and the roof rails. The cage looked fine on the jig, but when I plonked it on the chassis and offered up the bonet template, I realized that instead of subtracting 16mm on one section, I'd added it, so the whole thing was too long. :blush: Got away without having to make a new roof - I just shortened the one I had by the required 16mm. It's a couple of mm too narrow at one end now, but it's no biggie, as the bodywork will sit on top of that, and you won't see the oops.

Anyways, a few views of the roll cage as is. It's on the chassis rather than the jig, and the white bit of card is the template for the bonnet.

NR1F6989_small.jpg


NR1F6988_small.jpg


NR1F6990_small.jpg


NR1F6991_small.jpg


NR1F6993_small.jpg


NR1F6994_small.jpg


And then I thought to myself, why not mock up the parts I've made so far to see how it looks. Sans front and rear suspension though, but you kind of get the gist. And you know, it's starting to look like a racing car... ^_^

NR1F6996_small.jpg
 
OP
OP
Reynard

Reynard

Guru
Currently working on the bonnet, as I can work outside when it comes to the superglue given this window in the weather. Although I'm still doing as much as I can with the epoxy, as even outside, I'm still encountering allergy issues. Hey ho...

This stage also includes modelling the air filter and the exhaust manifold. Knowing how my luck runs, it was inevitable that the exhaust manifold appears to be a custom job rather than something off-the-shelf. Which means I can't dig up any additional reference pictures, and have to go purely by what I see on the photos. So some of it will have to be a bit of a guesstimate...

It's irritating, because there are loads of places that make race / rally exhausts for Ford Pinto engines, but nothing I've seen matches the configuration on this particular Higman.

And adding to my woes, it's a 4-1 manifold, which is going to be... interesting... to model.
 

MontyVeda

a short-tempered ill-controlled small-minded troll
Looking great.

Have you tried mixing the acrylic paint with a bit of PVA to see if that makes it stick?

I've absolutely no idea if it would work, but I'd definitely give it a try... but then again, it might give it a glossy finish you mightn't want.
 
OP
OP
Reynard

Reynard

Guru
Looking great.

Have you tried mixing the acrylic paint with a bit of PVA to see if that makes it stick?

I've absolutely no idea if it would work, but I'd definitely give it a try... but then again, it might give it a glossy finish you mightn't want.

Oh... Wood glue... I have a bottle in the garage (which I hope hasn't dried out), so always worth doing a test-piece. :okay: Although I'd hate to think what that will do to my brushes if that ends up working - sort of on a similar level to watercolour masking fluid, I'd imagine... :laugh:

Artists acrylics give a glossy finish unless you mix them with a matt finish medium.
 
Top Bottom