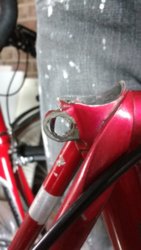
Looks quite nasty, but on the bright side at least the bike came FOC! Definitely looks like you'll need to put a couple of small diameter but heavy gauge flat washers either side of the boss and refit using a plain nut & bolt. Don't think you will get away with an Allen headed bolt this time. TBH, given the fact it's a bit of a mess, my inclination would to be to engineer a belt & braces bodge, so I would drill the seat post front-rear and put a fairly small diameter bolt, say 6mm, right through the seat tube and the seat post, so that the weight is mainly carried on the bolt and the clamp then doesn't need to be really tight - just tight enough to stop the post feeling wobbly.
The Eastwood spray stuff looks to be some sort of matt clearcoat lacquer, mainly aimed at the "rat rod" old car market. For what it is, it's rather pricey IMHO, which is generally the case with resto stuff sourced from Frosts.. There are similar products available on the 'Bay for about a third of that price! Given the frame damage I wouldn't get too carried away with cosmetics. I'd accept that it's basically a high quality bike but is not ever going to be a minter - hence the seat tube drilling bodge, which doesn't have to look too terrible if implemented sensibly.